Updated October 1, 2011
A warlord must rule his dominions with an iron fist.
Medieval Diplomacy is a giant electronic board game, with players from all over the world. Each player is the lord of a separate Realm, attempting to dominate Europe during the Middle Ages, circa 1320 A.D. As ruler, you will give orders to your captains and other minions, which in the game is done using the Diploware program (which you download from the website). There is a due date for everyone’s orders, in which time all game events occur. Then, everyone is sent the results (and things continue onward in the same manner). This is the Rulebook, which you can use as a reference, in conjunction with the help menus of the Diploware. The website is:
http://www.lords-of-conquest.comIf you dont have the diploware on your computer, you should download it asap here.
If you are just starting out, you probably have only a vague idea of how things work at this point. Don’t worry; you shall soon get the hang of it. The tutorial is available from your start menu when you install the diploware, and its important that you work through it. There are plenty of experienced players with good advice, just join the discussion group from the webpage and dont hesitate to fire off your questions.
Contents:
You can ctrl+click on the hyperlinks to go straight to a chapter or section – I’ve offset some of the links so that you don’t accidentally hit the wrong one.
Chapter 1: Introduction tutorial, mechanics of sending and receiving turns, where to get help
Chapter 2: Headquarters how to use the HQ of the Diploware
Chapter 3: The Map how to understand what you see on the map
Chapter 4: Turn Events the order in which the Diploware orders the game each turn
Chapter 5: Details more in-depth on various aspects of the game
Chapter 6: Battles the gritty details of how battles are won and lost
Chapter 7: Troops combat strength, defence, speed, cost, upkeep – it’s all here
Chapter 8: Realms a little historical data on each country, and where to find them
Chapter 9: Advice what to do when you’re new, and 2 sheets well worth printing
Chapter 10: FAQ some miscellaneous questions
First, close any unnecessary programs you have running. This helps to ensure that you don’t have too many things running on your computer, and so your Diploware will run efficiently. This is a very important step! After this, start the Diploware, which brings you to the Start-up Menu, where you can select a file to load. When you are playing in a game, you should select either your saved orders, or your newest Results file, which was sent to you by the GM. When you select this and open it, you are brought to your Headquarters (if not, then contact the GM for troubleshooting).
At the top part of the Diploware, you can see:
By clicking on the Messages at the top, you can see reports of the last turn’s events. You can click between normal Messages, Battle Reports, and Proclamations. You can see the following:
Even though you are impatient to learn about the map, I will now talk about the Game menu. Here, you can do the following:
Each unit can perform different orders. All game events happen during turn events, and all orders for all realms will be carried out at this time. Such things as units moving, battles and revenues, etc. happen. They occur in a certain order, which is explained in Chapter 4. If you are wondering about a particular game event (such as how units march, how revenues are collected, etc.), then please skim through Chapter 4 and Chapter 5, which detail these activities. Also, please note that game events happen in a certain order. There are 3 main parts to turn events; Initial Events, Movement Events, and Final Events. Each type of activity is explained better in Chapter 4, as well as the exact order in which it will happen during turn events, so be sure to look through that chapter (especially be sure to know about Phases, to help with your planning). For example, declaring war happens before movement, so this means that you can declare war on an enemy, and then move to attack him that same turn. But, troops are built after all movement and battles, so the troops you build won’t be there if an enemy attacks.
Important Notes about Sending In Your Turn:
Turns are due at the same time for all games, and there is 1 turn per week (unless otherwise indicated for your game).
|
LOCATION |
DUE DATE |
|
California, USA |
Tuesday, 5:00 PM |
|
New York, USA |
Tuesday, 8:00 PM |
|
London, England |
Wednesday, 1:00 AM |
|
Sydney, Australia |
Wednesday, 11:00 AM |
If you don’t send your turn in on time, please don’t expect the game to wait for you. Sometimes you
might get lucky – if you haven’t received your next turnfile, there is a good chance you can still send
your turn in and get it processed, but there is no guarantee. Send your turn in before the deadline if you
want to be sure it will get processed.
But, please be advised that replies to email by the GM are fairly slow, because of the volume of email.
Bonus Files: There is a special upgrade available, that will add numerous pictures and sounds to your diploware. However, this upgrade is only recommended if your computer is at least 500 mhz - otherwise, it will slow your diploware down quite a bit. Go to the GM notes section of the webpage to download this.
Offer Alliance:
This is only for a neutral realm, and is to attempt to form an alliance.Sometimes you will see a message in green – this is advice from Joe Brennan, and may be of some value. J
Troop Upkeep Costs are an Important Consideration
After opening your turn, you are brought to your Headquarters, and you can return here by clicking on Headquarters at the top of the Diploware. You can think of this area as your Throne Room, where your advisors are available to carry out your commands. Performing an order would be similar to summoning your Grand Chamberlain, Chief Diplomat, or other minion to carry out your instructions. Here, you will see:
Please understand that these values are not always exact – some values may be rounded to the nearest number. To be on the safe side, you should consider leaving a surplus of two gold in your treasury.
Each Realm has Diplomatic Relations with every other Realm in the game, which is shown on the list of Realms at your Headquarters. Your main Diplomatic Relations with each realm will be one of the following:
The orders you can issue to change your diplomatic relations are:
Each Realm also has diplomatic statuses with other Realms, which are:
As mentioned before, here you can see all of your planned Headquarters orders. This has:
Granting Full Passage Rights allows Cooperation, but can expose
You to Duplicity. Limited Permission May Be a Better Option.
At last, we come to the map. To get here, click on the Map at the top of the Diploware. You can see a giant game board, with provinces and seas marked by black borders, as well as the troops in each location. You can scroll up and down to see a greater area of the map. You can think of it as if your realm’s advisors have built a model replica of Europe. Major locations and scouting reports of troops have been plotted here with miniatures as well, and all of this represents your view of the actual political situation of Europe. It is up to you to write planned orders for your followers; to expand and protect your realm. Here, you will see the following:
Seas:
A sea represents a large expanse of water in the game, with the name written in blue. Seas are not owned by any Realm, and do not yield revenue. You can move your fleets through seas, which can transport armies and engage in naval battles.
A province is a large tract of land in the game, with the name written in black. Some important notes about provinces are:
Your forces can move between different locations that are adjacent to each other. However, there are various barriers to movement between locations. Some borders are blocked by natural features such as swamps, dense forest, mountains, etc., which are virtually impassable for an army, with its supply wagons and so forth. Barriers to movement between provinces are shown with mountains (although the barrier is not necessarily mountainous terrain). Armies cannot march between such provinces. Some coastlines are blocked by cliffs, unfavourable currents, dangerous shoals, etc. Barriers to movement between a sea and a province are shown with reefs (although the barrier is not necessarily reefs). Fleets cannot load or unload armies across such provinces, and fleets cannot anchor at such a province.
Each province and sea may have troops stationed there. Ships can be anchored in a province, or can be sailing in a sea. Soldiers can be located in a province, or aboard ships in a sea. On the map, the troops (soldiers and ships) are shown in the following manner:
For example, if you see a miniature of an infantry, with a blue base, and the number 8, that means you own 8 troops there, and the most valuable type is infantry. If you see a miniature of cavalry, with a red base, and the number 3, then you know that there are 3 troops owned by foreign realms (it could be more than 1 realm), and the most valuable type is cavalry (there could be infantry there as well).
JB: To get more information, click on the Troop Miniature. A box will open, explaining what troops are there, and which country owns them. Independent troops hold many provinces at the start of the game, and it is typical strategy for many players to start the game by attacking neighbouring independent provinces.
Map Options:
On the bottom-right of the map, there is a button with a hammer and wrench. This changes the map display. You can do the following:
To get more detailed information about a location, click on some part of it on the map. This brings up the Location Report. This shows you:
When you open the Location Report for a province, orders may be available. The order buttons are on the right-hand side. These are all Headquarters’ Orders, and can be seen on the HQ Plans menu (these activities are not done by units). The orders available are:
Under the map, there is a list of units that you own. You can see the following for each unit:
From the map menu, you can issue a number of orders to your units. First, select a unit on the unit list by left-clicking your mouse on the unit. The available orders for that unit will then be shown to the right of the unit list. When you select a unit, you can see its location on the map, as the troop base will be outlined in white. Also, any movement orders for that unit are shown with blue and red arrows (a blue arrow means you are moving through a location, a red arrow means the location is your last destination). You can also double-click on the selected unit, and the map will centre on it. Once you have selected a unit, you can perform different orders. The major unit orders available are listed on the right-hand side of the Unit List. You select an order, and then you receive a menu where you determine the specifics of the order. Each type of unit has different orders available. The orders are:
As you know, you can give your units various orders. The orders given to a unit are saved onto the Unit Plan for that unit. Each unit has a separate Unit Plan. To see the unit plan, right click on any unit on the unit list, or select a unit and press the View Orders button. The Unit Plan shows various information about the unit. In the middle part, you can see:
At the top left of the Unit Plan, you can select to show the troops or commanders in the unit. If commanders are selected, then any commanders in the unit will be shown, and you can perform orders for them, which are:
At the top left of the Unit Plan, you can see the troops in the unit. At the top, you can select to show commanders or troops. If troops are selected, then you can perform orders for them, which are:
On the left side of the Unit Plan, there are different admin orders for units. Each type of unit (Army, Fleet, Garrison) has different orders available, and the units that can perform each order are listed. All of these orders are done from the Unit Plan. None of these orders cost Move-points to perform. In addition, for garrisons, you can examine fortifications in the province. The orders that can be performed here are:
JB: This is useful if you have an army of infantry assigned to low ranks and an army of cavalry set to high ranks. You can put some infantry in the second rank, and tell them to retreat when the first rank is destroyed. You can order the cavalry to follow a unit in the second rank of infantry. That way your cavalry will retreat when your infantry decides to do so. If this seems tricky, perhaps you should have combined both armies together before attacking. J Beware of the danger involved if the unit you are following is killed in battle. Without that good man’s leadership to tell the lads to retreat, all your other soldiers will die in the field beside him.
JB: You should always click this option on if there is any chance of your navy taking hits. The last thing you want is to have your non-fighting armies drowning because they wouldn’t help out the sailors in a battle.
There are some map options available that make viewing the map easier:
Determine Units Shown on the Unit List: You can change the unit list so that only some types of units are shown. Click on Map Options, and you can see 3 buttons: Armies, Fleets, and Garrisons. Clicking these buttons will change the units shown on the unit list. For example, click on Armies, making the button unlicked. Now, go to the map, and Armies are not shown on the unit list. Go back and select armies again, and they will now be shown on the unit list.
Strong City Defences doth increase troop combat strength.
Everyone prepares their orders separately, and then sends them to the GM to be processed. Everyone’s orders will be carried out at the same time. If you don't send in orders, then your Realm won’t do anything except pay upkeep and collect revenues (your forces will still defend your lands). But, other Realms will still carry out their orders. All the game events happen in a certain order, which is shown here. Pay special attention to the order in which events are listed. This is the exact order that they occur when turns are processed. Also, please see the Details section - these concepts are important for understanding this chapter.
Everyone’s turn is processed together at the same time. There are "First Events", then "Movement Events", and then finally "Last Events". The First Events are things like declaring war, etc., which all happen before the Movement Events. The Last Events are things like gaining revenue, etc., that all happen after Movement Events. Pay close attention to the order of events in the Turn Events section. This is how you will know when each of your orders will happen when turns are processed. For example, changing Acceptance happens in First Events, so this will happen before any movement. Also, ownership change happens during Movement Events, so this is only after all First Events are done (Ownership change happens in phases, so the ownership of a province can change more than one time during the turn). Gold revenues happen in Last Events, so this happens only after all movement and battles (in the Phases of Movement Events) are complete.
Movement Events happen in a number of "Phases". A Phase is about 1 month of time (a Phase could also be called an "impulse" if you are more familiar with that term in wargaming). Each phase, various events will occur, and they repeat a number of times until no units have any Move-points. For example, on Phase 1, all units move 1 location, and then battles happen, province ownership changes, etc. Then, there is a Phase 2, and all units move 1 location, then battles happen, province ownership changes, etc. These Phases continue until no units have any Move-points left. When there are no more units that can move, then there is 1 more extra Phase, and then Movement Events are complete. When that happens, the Last Events happen. For transferring, units will transfer only if they are in the same location at the same phase. If units never arrive at the same place at the same phase, then no transfer will happen! Also, remember phases for coordinating unit movement. For example, you give Army#1 orders to invade enemy Province A, and you give Army#2 orders to move to friendly Province B, and then invade Province A. These armies won’t arrive at the same time! This is what will happen: Army#1 will invade during Phase 1, while meanwhile, Army#2 will move to Province A during Phase 1. Army#2 will invade during Phase 2 (although if Army#1 succeeds, you will own the province by the time Army#2 gets there). A better plan would be to give Army#1 orders to Wait and then invade, while Army#2 has orders to move and then invade. This way, on Phase#1, Army#1 will wait (remain in place) while Army#2 moves to Province A. Then, on Phase#2, both units will attack together.
Here is the list of all events that occur in each round, in order. Note that the movement events repeat until all possible ordered movements are completed. Each event is explained in the rest of the chapter, in order.
First Events:
This is the first part of Turn Events. These steps are:
This happens first. This changes the diplomatic relations between Realms from Neutral to War. This is done by Declaring War. Only 1 Realm has to do this, and then war will be declared. However, you can’t declare war with a Realm that is your Ally. In this case, you can’t declare war this same turn. For an ally, you will need to cancel your alliance. It will take one turn to break the first relations, and then you can declare war the next turn. When war is declared, then all Passage Rights and Special Permission will be immediately cancelled between the two realms, and cannot be established while the two realms are enemies.
Ctrl+click here for more on Invasions.
This step is to change the Acceptance between all Realms. You do this with the Change Acceptance action. This indicates whether you will accept gifts from another Realm (including provinces, transfers and gold sent). If you don’t want their gifts (for whatever reason), then change your Acceptance to No. This happens at this time. A realm could give you a province it is about to lose to try and embroil you in a conflict you want nothing to do with.
This step is to change Passage Rights between all realms. This is not the only way to give permission for a realm to move through your territories. You do this with the Grant Passage Rights or Revoke Passage Rights actions. You can grant or revoke Passage Rights to another realm (but not an enemy realm). If you grant Passage Rights to a realm, then they can move through all of your lands at will. This is potentially hazardous, for should they decide to attack you, they could send out small units through your lands. Next turn, they could declare war, causing all manner of havoc. For a trusted ally, this is useful, as he will be able to retreat into your lands, etc.
This is to change the Special Permission for any provinces you own. For each province, you can indicate which realms will be granted permission to move through it. You do this with the Grant Special Permission, Revoke Special Permission actions. This is to give a realm permission to move through a single province, which is safer than granting full Passage Rights.
Ctrl+click here for more on Permission.
This step is to form all new armies. This can only be done by armies and garrisons. For all new armies being formed, they are created now. Each Realm can have only 99 armies. Armies formed can have troops and commanders transferred into them, and can be given orders the same turn they are created.
This step is to form new fleets. This can only be done by fleets and garrisons. For all new fleets being formed, they are created now. Each Realm can have only 99 fleets (these are completely separate from armies). Fleets formed can have troops and commanders transferred into them, and can be given orders the same turn they are created.
Various Administrative Actions Performed:
At this time, a number of administrative orders are performed, which are:
Same Location Transfers Occur:
This step is to transfer troops and commanders between units. These are transfers that will happen because the recipient and giving unit are in the same location. These transfers will always succeed, and will happen at this time (prior to any movement happening). Transfers also happen during Movement Events.
Ctrl+click here for more on transfers.
The next step is reassign troops to different ranks. Each unit has 5 ranks, and each troop in a unit is in one of these ranks. Remember, ALL troops cause damage against the enemy, no matter what rank they are in (Ranks and Retreat Level are explained in Chapter 5). Troops in lower numbered ranks are taken first as casualties in battle – as a general rule, put your worst troops up front.
JB: I like to put heavy infantry up front, because they often survive a small fight without any casualties. When I’m besieged, I also put them up front, because two cheaper units, each getting the benefit of city defences, will make a bigger impact on my enemies. You can reorganize a type of troop by placing all of the individual troops into different ranks. All of the troops will now be placed into their new ranks. You should check your units to make sure the troops are assigned as you wish. Whenever you transfer troops into one of your armies, you should re-assign the new troops to ranks, and whenever you build new troops you should reassign them also – unless they are about to be put into another army (in that case, you reassign them once they’ve been transferred). Keep in mind that troops are reassigned in First Events (not during movement). You can put as many (or as few) of your troops in each rank. You can leave ranks empty. JB: If you have a small force, and want them to attempt a risky move to a currently empty enemy territory, you might like to put one troop in the first rank, and set the retreat level to rank one. If enemies turn up, you’ll take casualties from the first round of combat, but the rest of your troops will flee like the cowardly scum they are. It’s better than having them all die, isn’t it???This step is to get rid of troops that you do not want. If you don’t want to pay upkeep for commanders or troops, then you can disband or salvage them. Disbanding soldiers or scuttling ships will remove the troop, so you won’t have to pay upkeep that same turn. Salvaging is the same thing, except that you may gain gold from doing this. Salvaging represents taking equipment, horses, etc. from the disbanded troops. To gain salvaged gold from ships, the unit must be in a province (not a sea).
Okay, now that all of the first events are complete, the main part of the turn activities happen. These are called Movement Events. These steps are performed one at a time. After the last step, if there are any more armies or fleets that have orders to perform, then all of the steps in Movement Events will repeat in the same manner. Each time Movement Events happen, this is called a Phase (this is explained better previously in this chapter). This continues in a number of Phases (each phase, movement events happen). After all units have performed all their actions, there will be 1 extra phase, and then Movement Events are complete. For example, an army has orders to March to province A, then March to province B. In the first Phase, all of the steps in Movement Events happen, and occur, and so during Phase 1, the army will march to province A. On Phase 2, the army will move to province B. If more units have actions to perform, then there will be additional Phases. There may be a Phase 3, Phase 4, etc. The steps of Movement Events are:
This step is for all transfers to happen. Transfers will happen exactly like they did in First Events, with the same requirements. Each unit will check to see if it has any transfers to perform, and if the recipient is in the same location. If the recipient is there, then the transfer will happen. If the recipient is elsewhere, then the unit won’t transfer (transferring is explained better in Chapter 5).
JB: A simple rule of thumb is: troops can only transfer if they’re in the same place at the same time. Look at the tutorial: you could move your troops from Zodzina and Mazyr to Volodymir. If you have ordered your archers to wait, then all three units are in the same place at the same time. You could transfer them into just one army, and you’ll still have one movement point left to move them all on to your capital, Minsk. Why you’d do that, I have no idea. But you could. JCtrl+click here for more on transfers.
Armies Prepare To Board Foreign Fleets:
This step is for each army to prepare the Board Fleet action. You don’t do this if your own fleet will load your army, this is only for a foreign fleet that will do so. A foreign fleet can only load your army if your army performs this action! This will not cause an army to be loaded at this time, but will prepare the army to be loaded later. This action is only needed for boarding a fleet owned by a different realm. This action indicates which realm will be allowed to load the army. Without this action, your army will refuse to board any foreign fleet. When an army will board a fleet, it cannot move that turn (loading/unloading armies is explained better in the Details section).
Your army can be a marine on your ally’s fleet. So long as you have checked the box on your army’s description box so that it says "Board Enemy Ships in Sea Battles" then your soldiers will act on your ally’s ships as marines just as they would work on your own ships.
If your ally chooses to break faith with you, and your soldiers are on his ships, then there will be a battle between your soldiers (and any of your accompanying ships) and his ships (and any of his accompanying soldiers). Generally you would expect the ships to win such an encounter. But if the soldiers win, they could capture some of the ships, and thereby save themselves from drowning.
If you wish to load an army onto your own fleet, this is an action undertaken by your fleet, not your army. You order your fleet to load an army. You don’t need to order the army at all – unless you want your army to board a foreign fleet.
This step is for all armies to be loaded aboard fleets (remember, harbours are not needed for loading/unloading armies). In order for an army to be loaded onto a fleet, these conditions must be met:
When an army is loaded, that army will not be able to move any further during the turn (it will have 0 Move-points). The fleet can still move.
Note: A Royal Galleon has Marine Space for 2, and Storage for 2. This does not mean you could put four infantrymen on as marines and two as passengers. You will only get two infantry units on the galleon, and you can set them to marine duties. A trading cog can carry the same amount, but cannot use the troops as marines in battle.
Ctrl+click here for more on Fleet Loading and Unloading.
This step is for each fleet to sail 1 location. A fleet can sail between seas and provinces (for a province, this is to sail to the coast and dock ships there). A fleet can only sail to 1 location per phase - a fleet can sail to additional locations in other Phases. (It is important to understand Movement, Move-points and Permission, which are explained in the Details section). For sailing, there are the following conditions:
Ctrl+click here for more on Move-points.
A Homeless Fleet is any fleet located in a province, but there is nowhere for the fleet to anchor. This will happen if there is no harbour, or if the province is owned (or conquered) by an enemy. A harbour can be destroyed, and in each case, all fleets there will be Homeless Fleets. Such fleets will flee to any connected sea (a random sea will be chosen). If a fleet flees in this way, it will do so in the next phase (not the current one) and will use up all Move-points, and will not be able to follow any sail orders. If for some reason there is no connected sea, then all ships in the fleet will be scuttled, and a new army will be created to contain all commanders that were in the fleet.
This step is for Sea-battles to be fought. This is a battle between enemy fleets and marines that are in a sea. Fleets are never engaged in battles on land. Sea battles occur according to the Sea-battle System (this is explained in Chapter 6). Enemy ships will be involved in the combat, as well as Marines, which are soldiers in armies loaded aboard the fleets fighting. Whether troops fight as marines depends on the Marines Option of an army, and also the available Marine Capacity of a fleet (this is explained in Chapter 5). Enemy fleets in the same sea will always engage each other in battle. If a fleet retreats from a battle, this will use up all of the fleet’s Move-points and the fleet won’t perform any other actions that turn (including transfers, etc.) The victors of a sea-battle may capture ships lost by enemy fleets. All Sea Battles will be resolved at this time, one by one, until there are no more enemy fleets in the same location. Note that a fleet could retreat from 1 battle, only to find itself in another sea, and have to fight another battle. If a fleet is destroyed in battle, any commanders in the fleet will be transferred to other available fleets (if none are available, the commanders will be lost at sea).
Ctrl+click here for more on Sea Battles.
This step is to check all fleets to make sure there is enough Storage available to contain the total weight of all armies loaded aboard. All fleets are checked in this way. A fleet may have insufficient storage if ships are transferred out, discarded, or lost in battle. If a fleet has more weight loaded aboard than storage, then troops will have to abandon ship. If possible, these will be transferred to other fleets you own. If this is not possible, then troops will have to be abandoned at sea. Troops that are heavier and have less value have a tendency to be thrown overboard first, but you will have no control over what you will lose. So, try to make sure you have enough storage to carry your valuable cargos!
Ctrl+click here for more on Storage and Weight.
All Armies Unloaded Onto Provinces:
This step is for all fleets to perform the Unload Army action. Each fleet can have numerous armies loaded onto it. These armies can be unloaded onto a province (remember, harbours are not needed for loading or unloading armies). When an army is unloaded, it will be placed onto the target province. If this action is performed successfully, then the fleet’s and army’s Move-points will be all used up, and neither unit will be able to move any further for the turn. The conditions for unloading armies are:
There is a negative combat modifier for your troops if they unload on a province where there are enemy troops. The modifier will only take effect during the first combat – if you win the first battle, and more enemy troops arrive in a later phase of the same turn, there will be no negative modifier. If you bring in more troops next week, and your enemy attacks at the same time, your troops will not have a negative modifier either, as the province is now owned by you and it is therefore not an amphibious assault.
Note – if there is an empty enemy province you wish to invade, and your enemy marches troops there in the first movement phase, they will meet simultaneously. The enemy will still own the province, so your invasion force will get the negative modifier for an amphibious assault.
Ctrl+click here for more on Amphibious Invasions.
This step is for each army to march 1 province for the current Phase. This will only happen if the army meets all conditions for movement (Marching is explained better in Chapter 5). Each army will only march to 1 province at this time (an army can march to additional provinces in other Phases, but an army can only move 1 location per phase). After an army marches, then the Move-point cost is taken from the army’s Move-points. For marching to succeed, there are the following conditions:
Crtl+click here for more on Movement and Movepoints.
Ctrl+click here for examples of Movement.
Ctrl+click here for more on Invasions.
Ctrl+click here for more on Coordinating Movement.
Defend Fortifications Option Changed:
This is for all armies to change their Defend Fortification option, as they prepare for any battles. This option indicates if an army will enter and defend a fortification if there is a battle in the province. If an army does this, the army will gain a defensive bonus from any fortification. But, if there is a fortification, the army will not be able to retreat from the battle. If the unit is set to not defend fortifications, then it can retreat normally. If there is no fortification, then this option has no effect (the unit will be able to retreat then).
Ctrl+click here for more on Fortifications.
Cross-border Battles Are Fought:
Now, all Cross-border battles happen. This is a battle that happens when 2 or more enemy armies attempt to move into each other’s locations on the same border. This is related to armies marching, and only the units actually moving are involved (garrisons will never be involved in cross-border battles, and neither will fortifications). For example, Province A connects to Province B. Army#1 moves from A to B. An enemy army moves from B to A (this is all happening in the same Phase). These 2 enemy units are moving to each other’s location, so this will cause a cross-border battle to happen, at the border of Provinces A and B. If another army was moving from C to A, that army would not be involved in this battle (only units moving from A to B or from B to A will be involved). You can consider the border a completely separate province for the purposes of this battle, and any unit not on the border will not be involved. So, no fortifications will be involved, and neither will units located in the provinces, or units that were unloaded into the provinces. Cross-border battles are resolved similarly to normal province battles. However, if a unit retreats, it will go back to where it was before it attempted to move. So, in the above example, if Army#1 retreated, it would just move back to Province A. This may cause another battle to happen in the next step (province battles).
Cross-border battles do not affect the immediate movement of the winning army – that force will continue to move to their ordered destination, and may fight another battle when they get there – but if it was ordered to do any more movements, it will not. As for the loser, his army will not be able to successfully complete its ordered move.
Ctrl+click here for more on Battles.
This step is to check for all Land Battles to happen. A land battle is a bloody combat between enemy armies (and any garrison, if there is one) in the same province. In the previous steps, all armies have marched 1 location and fought any cross-border battles. Now, land battles will happen in all provinces where there are enemy units. Battles will be fought according to the method explained in Chapter 6. Some important notes about land battles are:
Ctrl+click for more on Battles.
This step is for the ownership of provinces to change. If a province is invaded, and all friendly armies are destroyed or have retreated, then the invaders will now own the province. If a province is invaded by more than one Realm, then the Realm with the greatest number of troops/commanders in the province at this time must have a total combat of at least 10 (which means a lone siege machine cannot conquer a province). If ownership changes, the following happens:
If two or more countries have troops in a province, and the province is to change hands, then it will belong to the country which has the largest total of troops in the province. Eg Denmark and Norway are allies; both move to Flanders, and conquer it. Denmark has eight heavy cavalry, Norway has nine men-at-arms. Norway will get ownership, simply because nine is more than eight. The quality of the troops is irrelevant in determining ownership – quantity rules!
If your province is conquered by another player, and that player doesn’t annex the province, you have only three turns to re-conquer it, before your annexation is automatically cancelled.
This step is to perform all Pillage orders for all armies and garrisons (fleets can’t Pillage). The ownership/annexation of a province does not matter for Pillaging. To Pillage is to seize gold from a province, which can cause devastation to that province (increasing the damage level). The conditions are:
If all conditions are met, then the province will be pillaged. This results in:
This step is to check to see if the Movement Events should be repeated. If any unit has Move-points, or can perform valid actions, then Movement Events will repeat. In this case, there will be another Phase (so if the previous Phase was 3, then there will be a Phase 4). After all units have performed all their actions, there will then be 1 extra Phase, and then Movement Events are complete, and then Final Events will happen.
After all the Movement Events are complete, then there are the Final Events. These happen now.
This step is to check to see if the Damage of any province is increased. Damage will occur if:
If any of the above events happened, then province damage will be increased +1, to a maximum of 3. The damage can only be increased +1 each turn (if multiple events happened, province damage is still only increased +1).
This step is to perform all Send Gold actions, where you send gold to another realm. There is a cost of 10% of the amount sent, which represent transportation expenses and merchant fees. The recipient garrison can be owned by a foreign realm, or the same realm. To send gold, the conditions are:
This step is to pay the upkeep costs for your commanders, soldiers and ships. Commanders gain upkeep first. Gold used for upkeep will be lost. If there is not enough upkeep, you don’t necessarily lose half your
troops, but each troop not receiving full upkeep has a 50% chance of being lost. So, you could lose half, or less than half, based on the chance of each troop.
This is for all soldiers recruited and all ships built to be placed onto their garrisons. If there are not enough funds to build a type of troop, then the number to be built will be reduced to what you can afford. If the province you were building in is conquered by another nation, you will not be able to build there. If your province is attacked, but you successfully defend it, then you will be able to build troops there.
Remember that your HQ is not always precise in determining exactly how much surplus gold you have. If you have a surplus of two gold when you send your turn on, you can be confident that all of your purchases will succeed.
Ctrl+click for more on Building Troops.
This step is for garrisons to hire commanders (only garrisons can do this). The conditions for this action are:
If the garrison meets all conditions, then a new commander will be hired. This individual will have ratings in different skills, some commanders have higher ratings than others (you may get a highly skilled individual, or you may get an amateur). Commanders will improve their skills from successful battles.
Ctrl+click here for more on Commanders.
This step is for garrisons and armies to Annex Province. Annexing means to assimilate it into your realm, and creating an infrastructure there with officials, governor and tax collectors, so that you can extract revenue from the local inhabitants. Annexation cost is equal to the maximum revenue of the province, as shown on the map screen.
JB: There is a significant change from older games – you no longer have to pay double to annex a province with a city. You pay the annexation cost now, but you won’t receive any revenue from the province this turn (you will get revenue next turn). If you lose ownership of a province, it will remain annexed to you for a few turns more, and then the taxation infrastructure will be lost, so it will be annexed to no one. So, if you lose a province, and then recapture it soon, then you won’t have to annex it again. To annex a province, you must own it now, and also you must have owned it at the beginning of the season. You do need troops to conquer a province, but they don’t have to stay there while you annex – the province could be empty of troops, and you could still annex it. Also, you don’t need to keep troops in an annexed land – you can leave it empty, and it will stay yours forever. JB: Unless an enemy army moves in and takes it from you, which you have to expect if you don’t guard your borders.Remember that your HQ is not always precise in determining exactly how much surplus gold you have. If you have a surplus of two gold when you send your turn on, you can be confident that all of your purchases will succeed.
When a province changes ownership, it will remain annexed to the realm that it was previously annexed to. However, if the ownership of a province is different than the annexation, then the province will not yield revenue. In addition, if this continues for 3 turns, then the province will become annexed to independents. This represents the decline and wasting away of the officials and infrastructure previously organized there. So, if you lose an annexed province, try to recapture it in a few turns, because after 3 turns it will no longer be annexed to you (if you recaptured it after a long period, you would have to annex it again).
This step is for all structures to be built or repaired. These activities include building/upgrading/repairing fortifications, as well as building production areas and harbours. The conditions for construction are:
For a unit that meets all conditions, the unit will now perform construction.
A province could have it’s fortification level go up twice in one turn, but only if it has damaged fortifications that are left in peace for the turn, and you decide to build another level of fortification at the same time. Eg Your Fort is level 2, but it has suffered a little damage and is currently on Level One. The damage will repair automatically because the province is not attacked that turn, and because you’ve ordered 3 soldiers to build there that turn, it will be on Level Three at the start of the next turn.
Ctrl+click here for more on fortifications.
This step is for any gold left in your treasury to decay. At this time, 7% of the gold in your treasury will now decay, which represents pilfering, and frivolous expenses by your ruler as he lives the high life.
This step is to raze a structure in a province; a harbour, production area, or fortification level. Only armies and garrisons can do this. Gold can be salvaged from razing, which is indicated for each structure type. The conditions for razing are:
If a unit meets all conditions, then the structure will be razed. Any materials gained will be placed into the storage of the unit (these won’t decay, because of course decay happened previously). A unit can raze more than 1 structure, and if it has orders to do this, it will raze the first structure, then the next one, if possible.
This step is for all provinces to yield revenue to your main treasury. Province income is explained better in Chapter 5. The conditions for producing revenue are:
At this time, all provinces will deliver their revenues (which the inhabitants have worked hard all season long to produce).
Ctrl+click here for more on Province Revenue.
This step is to transfer the ownership of provinces between Realms. On the Diploware, you can give another realm a province you own. In order for this to happen, the following conditions must be met:
When ownership is changed, this won’t change the annexation of the province, and will also not affect any fortifications or harbour in the province (which will become owned by the recipient realm). Any garrison owned by the old owner will have all troops transferred into new units. So, you can’t use this to give away troops to another realm.
This step is for the revenue to be gained from any Proclamation that you made. When you make a proclamation, this will increase your prestige, resulting in extra production by your followers. Accordingly, you will earn 7 gold, which is placed into your treasury. In order to gain the revenue, the proclamation must be suitable, as explained in Chapter 5. Your population does not want to hear vulgarities, which may invoke divine wrath in this superstitious age - and some superstitions are real, for the GM is reading...
This step is to repair the damage level of provinces. Damage represents destruction that occurs to crops, population centres, bridges, etc. that reduces the revenue you can gain from a province. Each province has damage from none (undamaged) to 3 (heavily devastated). The damage level is increased at the beginning of Final Events (this happens from pillaging, battles, etc.) Damage is only repaired 1 level per turn. For damage to be repaired:
For provinces that meet these conditions, damage will be repaired 1 level at this time (this happens automatically). This step happens after revenues are gained of course, so revenues will be based on the damage level before damage is repaired.
This step is to establish peace treaties between Realms. If 2 Realms are at war, they can attempt to establish a peace treaty. This will only succeed if both Realms offered peace to each other. If this happens, then they will now be neutral. Otherwise, they will remain enemies.
This step is to cancel alliances. If 2 Realms have an alliance, then either Realm can cancel it. Only 1 Realm needs to do this, and then the alliance will be cancelled. If this happens, then they will now be neutral.
This step is to form an alliance with another Realm. If 2 Realms are neutral, then they can establish an alliance. Both Realms will need to offer each other an alliance. If this happens, then an alliance will be formed between them. Otherwise, nothing will happen. You can’t offer an alliance if you're at war. So, you can’t move from enemies to allies in the same turn, because that would take 2 turns (the first is to gain peace, and then next is to form the alliance).
Each ruler has limited prestige. A ruler’s personal prestige is vital to retaining followers and maintaining authority over the populace. Commoner status represents an undistinguished individual, of unremarkable qualities and bloodline, who is less able to gather a large following in his pursuit of empire. Royalty status represents a battle-tested ruler of royal bloodline, with great charisma, leadership, and other traits that mark a distinguished warlord. One gains this eminent status by simply contributing his GM fee, which is a modest donation that helps the GM with running the game. A ruler with Royalty status can control a larger realm and retain the loyalty of a greater number of followers than a ruler that is a Commoner. The limits are the following:
Ctrl+click here for more on Player Status (Royalty / Commoner).
This is the last step. If there is a Realm that does not own any provinces or troops, then it is defeated. A Realm needs to have at least 1 province or 1 troop, or it will be removed from the game. In this case, all remaining forces revert to independent status.
Ctrl+click here to go to information on Achieving Victory.
At this point, Turn Events are complete. Now, each player will be sent his new turn, and can load it into his Diploware, to see the results of the game
Troops can only be recruited in a Garrison with a City.
Chapter 5: Details of How Things Work
Here are a number of concepts that are useful to know about, as well as details about how things work.
This represents currency, precious metals, jewels and other portable items of wealth. You can send gold to another realm for diplomatic purposes. Gold is a common item used for recruiting troops, paying upkeep, etc. You gain gold by owning annexed provinces, or pillaging a province (you don’t need to own it to do that). You can also gain gold from making a proclamation.
For construction activities (like building or razing a fortification, etc.), you need gold and workers. A worker is a soldier. So, if a structure needed 3 workers to build, your unit would need to have at least 3 soldiers to build it.
You can see the total combat of a unit on the Location Report or Unit Plan (click on the status button). You can also see the total combat on the location report. This is the total Combat of all troops and commanders in a unit, added together. Each soldier and ship has a combat rating. Most troops have just 1 attack, but some troops may have more than 1 attack (the Attack is the number of times it can cause damage each round of battle). The total combat of a troop is the attacks multiplied by the combat. The total combat of a unit is the total combat of all troops. For example, a soldier with 2 attacks, and a combat of 35, would add (2*35) =70 to the total combat of the unit. In battle, this soldier type would have 2 chances to cause 1 damage each round of combat, and each chance would have a 35% chance of success.
All types of units can also be involved in battles. A battle is a conflict between 2 or more enemy units in the same location (units owned by realms with relations of war). Battles can occur on land, which only involve soldiers, or at sea, which involve both soldiers and ships. You don’t need to know all details about battles if you are just starting out, but some important notes are:
There are 3 types of units in the game: Armies, Fleets, and Garrisons. Each unit has a number of troops and/or commanders. Each realm controls a number of units, which can be issued different orders. A brief description of each unit type is:
There are 2 types of Troops in the game: Soldiers and Ships. You can examine the statistics of any troop type from the Location Report, or the Unit Plan. A Soldier represents a formation of armed men that can be placed into armies, such as a regiment of swordsmen. A Ship represents a group of sea-going vessels with crews that are placed into fleets or garrisons, such as a squadron of Longships and their crews. Each type of troop has different ratings and statistics. Note that to make things easier to understand, ships are also referred to as troops, as they include their crews and vessels. Also, referring to a soldier really means a formation of 200 men or more (peasants may represent 400 individuals, while heavy cavalry may represent 100 individuals, etc.) Important notes about troops are:
Building troops:
To recruit troops, go to the map screen and click on a garrison unit in the bottom section. Then go to "available orders" (bottom right side of screen) and select "recruit soldiers". A box will appear, showing you the limit of the province; it might say 0/13. This means you have recruited none, and can build up to 13 this turn. If you recruit two units, it will change to 2/11 (built two, can build eleven more). Pay attention to the price of your units. Make sure you don’t try to build what you can’t afford. The maximum number of troops you are allowed to build is equal to the maximum resource value for the city, as displayed on the map.
You are limited in your builds to what may be recruited in each city. Capital cities are more likely to give you more options. So a Mongol cavalry army might have difficulty replacing its really fast troops when they finally arrive in England. But they will be able to recruit longbowmen there. Over time, this allows your army to take on some of the characteristics of the peoples you invade – this is very historically accurate. A city will have the same build-list throughout the game – whoever owns Riga will be able to build Crusader Knights – even Muslims.
JB: *gasp* Oh, don’t be so shocked! Muslims used to capture Christian lads, convert them and use them in their army – they were called Janissaries. How do you know Muslim leaders wouldn’t have used Christian Knights in their armies if they had captured more of Europe?The troops you recruit will not be available to you immediately. You are simply ordering them to be recruited. If you can afford them, they will appear where you requested them in your next turnfile.
If you wish to build different kinds of troops than those currently available to you, then conquer cities in different regions, and see what you can build there. A list is not available here of what can be built in each city, as it has been left as a pleasant surprise for you to find out as you play.
When your troops are built, they will be in a garrison. To move them, you will have to put them into an army. If there is no army to transfer them into, click on the garrison, then go to "available orders" (bottom right of map screen) and select "form new unit", then click on the garrison and transfer the troops across to the new unit.
Ctrl+click here to go to Turn Events: Troops Built.
Commanders are skilled generals that can be assigned to lead units. A commander will give valuable bonuses to troops in battle. Some important notes about commanders are:
Ctrl+click here to go to Turn Events: Commanders Hired.
Ctrl+click here for more on Commander Modifier.
Ctrl+click here for more on Commanders in Battle.
Fortifications are walled, defensible structures, which can be manned by defenders in time of war. Each province may have a fortification, which gives a defensive bonus to troops defending the province. These structures can be built, upgraded, or razed. The statistics for each fortification level can be seen by examining it from the map menu (go to the Location Report for any location, then click Study, and then select the fortification there). All of the fortifications can be built by any of the players – castles are not restricted to Western nations. Some important notes about fortifications are:
If you conquer a fortified province, and wish to quickly rebuild it, you can do so in two ways. Firstly, if the province is peaceful for the turn, the fortifications will automatically repair, free of charge, by one level per turn. You can also use some troops and gold to build one level of fortification each turn. Eg I reduced the level 2 hillfort to defence level 0. The study view shows that it requires 3 workers and 14 gold to raise the fortification level by one. I have three soldiers in the province, so I order an increase in level to level 3.
The fortifications will repair one level per turn automatically, for no cost, so long as the province is not attacked while repairs are in progress. Repair only happens if there is no battle in a province during a turn, and no pillaging. If all is peaceful, I should have a level 2 fortification next turn. The turn after that, if I build fortifications again, the fortification level will reach four: +1 due to building, +1 automatic repair if peaceful.
|
Fortification level |
Total of units able to be defended by this level |
Combat attack bonus given to infantry units in the fortification |
Hit point bonus given to infantry units in the fortification |
Combat attack bonus given to cavalry units in the fortification |
Hit point bonus given to cavalry units in the fortification |
|
1 Palisade Fort |
3 |
45% |
0.7 |
15% |
0.3 |
|
2 Motte+Bailey |
6 |
47% |
0.9 |
17% |
0.5 |
|
3 Stone Tower |
9 |
49% |
1.0 |
19% |
0.6 |
|
4 Stone Keep |
12 |
51% |
1.2 |
21% |
0.7 |
|
5 Hillfort |
15 |
53% |
1.3 |
23% |
0.9 |
|
6 Border Fort |
18 |
55% |
1.5 |
25% |
1.0 |
|
7 Stronghold |
21 |
57% |
1.6 |
27% |
1.1 |
|
8 Fortress |
24 |
59% |
1.8 |
29% |
1.3 |
|
9 Heavy Fortress |
27 |
61% |
1.9 |
31% |
1.4 |
|
10 Castle |
30 |
63% |
2.1 |
33% |
1.5 |
|
11 Reinforced Castle |
33 |
65% |
2.2 |
35% |
1.7 |
|
12 Citadel |
36 |
67% |
2.4 |
37% |
1.8 |
Ctrl+click here to go to Turn Events: Construction Happens.
Ctrl+click here to go to Turn Events: Defend Fortification Option Changed.
Ctrl+click here for more on Fortification Modifier.Ctrl+click here for more on Fortification Hit-points.
Fleets have Storage and Weight ratings that affect the fleet’s ability to move. Storage represents the ability to carry things. For example, a fleet has ships with cargo holds. Weight represents the mass, bulkiness and difficulty of carrying a type of troops. Each ship has a different storage. For fleets, the total storage is the storage of all ships added together. If a fleet has more weight than storage capacity, then the fleet will have to dump excess soldiers overboard, until there is enough storage to contain the total weight of all troops loaded aboard. You cannot load an army onto a fleet if the weight of the army is 50% more than the storage of the fleet. But, you can perform transfers between fleets regardless of how this will affect the weight stowed aboard the fleet. But be careful, if a fleet has less storage space than weight (this can happen if a fleet loses ships in a battle or transfers ships out of the fleet), this will cause soldiers to have to be thrown overboard! Commanders have no weight, so this is not a worry for them.
Infantry have a weight of one. Horse units and siege machines have a weight of two.
Ctrl+click here to go to Turn Events: Fleet Storage Checked.
A Harbour is a port area in a province where ships can be docked. These are structures that can be built by players for a cost in gold. Harbours are only used for building ships, and for docking a fleet at a province. You do not need a harbour to land your troops amphibiously on a province, or load them from a province. Some provinces have no coastline, either because they are landlocked, or the coast has a barrier. A harbour on such a province has no purpose whatsoever. When a province is captured, there is a small chance that any harbour there will be destroyed in the looting that follows. You can also destroy a harbour if you wish. A harbour can only be located on a province that has a suitable coastline (connected to at least one sea), and also has a City. If a province has a harbour, then fleets can be moved onto that province (otherwise, they cannot).
Warning: Do not keep your fleet in harbour, unless the province is well guarded. If an enemy took possession of the province, all the ships would be scuttled, and some might even be captured by him!
Permission means that an army has been granted the right to move through a province (you don’t need this to invade an enemy province. You have permission if you meet one of these conditions:
To give or receive Permission, you can do the following:
Ctrl+click here to go to Turn Events: Special Permission Changed.
Armies and Fleets can perform movement, which is travelling from 1 location to another. Armies can only march between provinces of course, while fleets can sail between seas or between a sea and a province (sailing to a province represents docking at a harbour there). Each unit has a limited amount of Move-points, which are used for movement, as well as other activities. For movement, the following rules apply:
Note: the Diploware will allow you to order moves that won’t succeed. It will allow you to order your troops to march through six territories – even though the most Move-points you can possibly have is four! It is up to you to understand what the rules will allow your troops to succeed in doing in your turn.
Both armies and fleets have Move-points (garrisons can’t move of course). Each unit begins each turn with a number of Move-points. For fleets, this is the ship type in the fleet with the least amount of Move-points. For armies, this is the troop type in the army with the least amount of Move-points. For example, Army#2 has a soldier type with 2 Move-points and another soldier type with 3 Move-points in it. The Army will then begin the turn with 2 Move-points (because this is the troop type with the least amount of Move-points). Move-points are used to perform orders by armies and fleets, and are used in the following ways:
When you conquer a territory, you won’t be able to travel through it for one Move-point until next turn. Neither will any other player – once a province has been conquered by a player, anyone trying to move troops into that province will have to use two Move-points.
JB: Pay attention to that! Only the provinces that started the turn under your control (and those provinces you had permission to move through at the start of the turn) will allow you to move through for just one Move-point. Moving through two consecutive enemy territories will now work only if your units have four Move-points.
Your army will lose all its Move-points if it is attacked by another player’s troops, unless this happens in your own territory.
Ctrl+click here to go to Turn Events: Fleets Set Sail.
Ctrl+click here to go to Turn Events: Armies March.
An army, "The Royal Lions" has 2 types of Soldiers, Cavalry and Infantry. Cavalry have 3 Move-points, but Infantry only have 2 Move-points. At the beginning of the turn, the army will have only 2 Move-points (the same as the slowest troop type in the army). This army transfers all of the Infantry into a different army. Now, The Royal Lions will have 3 Move-points (because all of the slow troops are gone). The army moves into a province owned by the same realm, thus using 1 Move-point, so the army will have 3-1=2 Move-points remaining. Now, the army moves into an enemy province, for a cost of 2 Move-points. The army will now have 2-2=0 Move-points remaining, so it can’t move any farther in the turn. Example 2: Army A has Cavalry and Infantry. Army A moves through two friendly provinces, using 2 Move-points. Army A then transfers all infantry to Army B. Army A will now have (3-2) =1 Move-point to move. Army B will have 0 Move-points, as the infantry received had used up all movement before being transferred.
Another example:
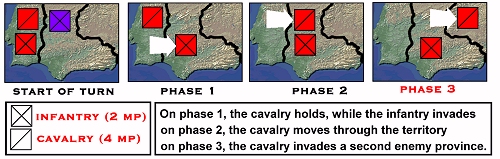
I have 2 armies that I want to invade with. One army is next to the target province, but the other army is 2 provinces away. What should I do to make sure they both attack at the same time?
I need to have my infantry army hold position on Phase#1, and then attack on Phase#2. I need to have my cavalry army move 1 location on Phase#1, and then attack on Phase#2. This is what will happen:
Phase 1: Infantry stays where it is (no cost), Cavalry moves (cost of 1)
Phase 2: Infantry army attacks (2 move points used), Cavalry attacks (2 move points used), and both will be in the battle.
As a footnote, I could transfer troops before the battle, during Phase#2. But, if I move and then transfer, the receiving army will have the used move points of the giving army! So, I won’t do that. Also, as another footnote, to transfer troops, both units need to be at the same location at the same time, or the action will fail.
A final example:
Aquitaine has moved troops to the French border. The Aquitaine army can move to two French provinces. The French have one army that could stop it. How can they guard both regions? One way is to stay still and hope the Aquitainians run into you. Or move to the other province. Either way gives you a 50% chance of successfully hitting the enemy army. You could march to the other province, and then march back, but if the enemy has moved to the original province, then you will have used one Move-point already, and it will now cost you 2 Move-points to return to your original province, and unless your whole army is made up of cavalry, you won’t be able to do this. The certain way is to hold position for a phase, then move to the other province. This way, you have a 50% chance of him running into your army, but if not, then you can be certain of hitting your foe in the other province, and you haven’t used any Move-points, so you will be able to expend the required 2 Move-points to get to the other province. The only problem with this strategy is that your foe will have invaded the other province, which will result in a little less income for you, even if you recover the province during the same turn. The best option is to know where your foe is going, and to know that you will need to have another player as a spy, within his confidence. It can be done!
Ctrl+click here to go to Turn Events: Armies March.
You will increase the size of your domain by invading enemy provinces and conquering them. You can invade independent provinces without declaring war. To invade provinces owned by another realm, you need to be at war. If you are not at war with a realm, you can only move through its lands if you have Permission. Your forces will never attack neutral or allied forces. As a note, the turn after you invade, you should annex all provinces if possible, and build as many production areas as possible if you intend on holding the province. Provinces only yield revenue if you have annexed them, and this investment will pay for itself many times over during the course of the game.
If two attackers in an independent province are hostile towards each other, the battle will be a 3-way battle; each side will attack all the others. The independent’s troops may attack you or the other invader. The one he attacks is random, same with everyone else's forces. For example, you have 10 troops, the other invader has 15, then for each unit owned by the independent, there is a 10/25 chance the independent will attack one of your troops, 15/25 chance of attacking the other invader. The same thing for which troops you will attack, etc.
At the end of a battle, all surviving troops will have 0 Move-points. If you invade an enemy territory and there are no enemy starships there, you may still have Move-points left eg: A Nomad has 4 Move-points. He spends 2 Move-points going to an enemy territory. If there are no enemy starships there, he still has 2 Move-points left, and can make another move. If there is an enemy peasant in the first sector he invades, however, and the Nomad eliminates the peasant, the Nomad will not be able to move any further – he has fought a battle, and his Move-points will be set to 0. Exception: Move is not lost for battles fought in your own territory.
Ctrl+click here to go to Turn Events: Declare War
Ctrl+click here to go to Turn Events: Armies March.
Invading two provinces in one turn:
Let us state a number of facts:
Now suppose we have an army of infantry and a force of light cavalry in the same province. An enemy army is adjacent. We can conquer him, but we would like to conquer the next province behind it as well, which is empty.
We can beat the enemy army, but if the light cavalry participates in the battle, they will be weary and tired (i.e. their movement will be stopped). So what do we do?
JB: Cool, isn’t it? Many other tactics can be devised based on these general principles.
Amphibious Invasions:
An amphibious invasion is when you unload your army onto an enemy province. This is not when unloading an army onto a Province where you have permission - it is only for enemy provinces. An amphibious Invasion has a chance of failure, which represents the difficulty of forcing a landing on an enemy province, when the invasion may be foiled by even light resistance, unfavourable tides or foul weather, etc. If an amphibious invasion fails, then troops will remain loaded aboard their fleets (no troops will be lost). An amphibious invasion’s success depends on the total combat of all forces that are being unloaded (Total Combat is explained in Chapter 3). Add the total combat of all soldiers in all armies being unloaded, and this will be the chance of success (this is the normal combat of all soldiers, without any modifiers). For example, the total troops in all armies being unloaded, amounts to 3 soldiers, and each have a combat of 20 (and each has 1 damage chance). The chance of success will therefore be 3*20=60, so the invasion has a 60% chance of success. An army with 5 soldiers, each with a combat of 25, would have a 5*125=125% chance of success (the invasion would always succeed).
Ctrl+click here to go to Turn Events: All Armies Unloaded onto Provinces.
Remember that each activity has different rules, and happens in a specific order during turn events. Each activity and the order in which it happens is explained in Chapter 4. Please note that turn events happen in Phases. This is important for coordinating the actions of your units, and in planning joint actions with your allies. It’s best to invade enemy provinces with your units at the same time, so all your combat power is concentrated at the enemy in 1 battle (the quicker you wipe out the enemy, the fewer casualties you will sustain). You can coordinate a cavalry army with an infantry army by having the infantry army wait 1 Phase, while the cavalry army moves next to the target province (the first time you wait, there is not move cost). Then, both units can invade at the same time (having the units invade on different phases can be a disadvantage for you in battles). For example, if your forces are all together, then they may be able to kill the enemy in 1 round of battle. In this case you will suffer less rounds of damage from the enemy (if your enemy lingered for 3 rounds, he could cause many more casualties to your force.)
Note: A movement phase is not regulated by the Move-point cost. All one Move-point orders happen at the same time as the two Move-point orders. The first order happens in the first phase, whether it costs one Move-point, two Move-points or zero Move-points!
Ctrl+click here to go to Turn Events: Armies March.
Essential for coordination is the "hold position" function. It is one of the options you get when you order a March to your army. It allows an army to wait in place during a phase, while other armies can get closer to the objective.
The first "hold position" order costs your army zero movement points. Succesive hold orders will cost one movement point each, however. You can only wait so long before your army has lost its opportunity to reach the battlefield in time, due to having run out of sufficient movement points. Let us see an example. One of your armies is adjacent to the enemy, while the other is two provinces away. How do you get them to the battlefield at the same time?
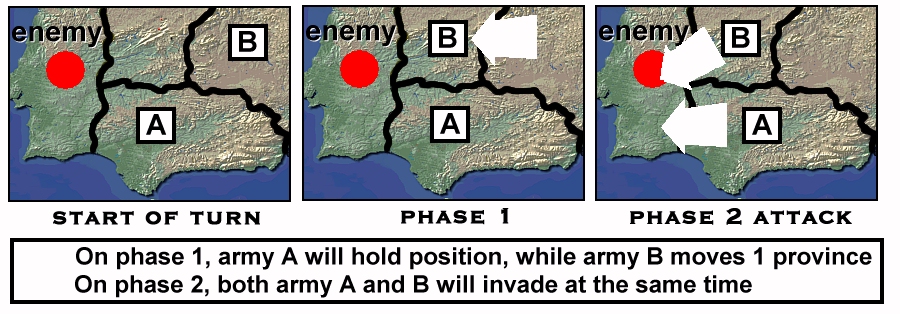
JB: The same principle applies if you have more than two armies, and to fleet battles as well. All kinds of variations are possible, some battles will require that you hold in phase two instead of phase one, for instance, to achieve surprise. You can hold position in hopes that an enemy will vacate a province, then walk in unopposed instead of fighting a pitched battle there on phase one. Then again the enemy might outguess your intention and prepare an ambush… Isn’t it fascinating? J
Fleet Loading And Unloading
You can load armies onto fleets, and also unload them. Harbours are not needed for loading or unloading; you can do this without regard to harbours by being in a connected sea (or the fleet can be in the same location). For loading and unloading armies, the following rules apply:
Here is an example of how much you can do in one turn with navies:
I have a fleet in the Baltic Sea, and I wish to attack Denmark, who has moved all of his troops north to assault Norway. My fleet has a storage capacity of 8. I also have an army of 4 Crusader Knights in Pomerania, and an army of 8 heavy infantry in Riga. I can split the Riga army up into
Army A – one heavy infantry
Army B – one heavy infantry
Army C – one heavy infantry
Army D – 5 heavy infantry
I order my fleet to load Army A, B, C and D.
I order it to move to Alborg Bight.
I then order it to move to Hanobukten.
I then order the fleet to unload Army A in Slavinia.
I order the fleet to unload Army B in Schleswig.
I order the fleet to unload Army C in Zeeland.
I order the fleet to unload Army D in Scania.
The fleet is now empty, and reduced to 0 move-points. But there is a rule that allows me to do one more load/unload.
I order the fleet to load up Army E – my 4 Crusader Knights in Pomerania.
I order the fleet to unload Army E in Scania.
I have now wrecked the Danish economy, and put a sizeable force in the way of the Danish army returning to Denmark. I just have to worry about what the Danish fleet can do….
JB: The funniest part of this example is that at the time of writing, I have a Teuton position, and by the time this document is published, my troops will be in very similar positions to the one outlined above. Now I can’t guarantee that Denmark will attack Norway, but I’ll bet this example puts the wind up him J Now, would I be fool enough to publish this if I intended on doing it? Or is that just a feint to make him think I’m not thinking about it? Ho ho ho!
Ctrl+click here to go to Turn Events: Fleets Load Armies.
Ctrl+click here to go to Turn Events: Fleets Load Armies Again.
Transferring is sending troops or commanders out of 1 unit and into another unit. For transferring, the following rules apply:
Ctrl+click here to go to Turn Events: Same Location Transfers Occur.
Ctrl+click here to go to Turn Events: Transfers Happen.
Each province yields gold revenue each turn. The amount of revenue a province will produce depends on the damage level of the province. Damage ranges from none to level 3 (the maximum), and occurs from battles and pillaging, and is repaired automatically by the local population (if the conditions are met). Damage affects revenue in the following way:
|
DAMAGE |
REVENUE |
|
None |
100% |
|
Level 1 (Light) |
80% |
|
Level 2 (Medium) |
65% |
|
Level 3 (Heavy) |
50% |
For example, a province normally produces 40 Gold. The province has a damage level of 2, so the amount of the gold gained will be reduced to 65%. The calculation is: 40*.65=26, so only 26 Gold will be produced. This works the same way with gold revenue (although production areas are not needed for gold revenue). Revenue is gained in 2 ways:
Ctrl+click to go to Turn Events: Province Revenue Gained.
Player Status (Royalty/Commoner)
In days of yore, an individual’s bloodline was deemed an important quality in determining his potential. A ruler’s personal prestige was vital to retaining followers and maintaining authority over the populace. To represent this, there are 2 player’s statuses for each ruler:
Here are the differences between the 2 statuses:
|
ITEM |
COMMONER |
ROYALTY |
|
Commanders |
None Will Join His Cause |
Maximum of 5 |
|
Troops |
No Limit |
No Limit |
|
Annexed Provinces |
Maximum of 7 |
Maximum of 70 |
Other than the above differences, both statuses are the same. Please note that Royalty status is completely optional, and not necessary at all. The average ruler can forge a powerful realm without it (but it has some useful benefits). Diplomacy is very important in the game (just like in real international politics). If you gather a small coalition together, your position will be strong, regardless of your status. Alliance victories are fine, so commoner status will not prevent you from sharing in the final victory. To see how to rise to Royalty status, go to:
http://www.agegames.co.uk/donate.html
Of course, anyone can change between commoner and royalty status at any time, and you can play as a commoner forever if you like (to see your current player status, go to the Messages Menu and click Player Info).
Ctrl+click here to go to Turn Events: Realm Limits Checked.
Historical Notes About Royalty/Commoner Status:
In the Middle Ages, the success of a realm depended largely on the qualities of its ruler, with royal bloodline as the most important factor in a ruler’s ability to unite his nation. A strong, able ruler could rapidly increase his realm’s standing and ability to expand, while a less able ruler often accomplished the opposite. But, regardless of a ruler’s ability, if his bloodline was not seen as Royal, he was simply less effective. Here is a case in point: Edward Longshanks, whose pedigree reached back to William the Conqueror, was a renowned warlord, able to carry out expansion and foreign wars. Longshanks’ son, Edward II, (the ruler of England in 1320) was overthrown in a conspiracy by his wife, and replaced a lesser noble, Roger Mortimer. However, without a Royal bloodline, Mortimer was an ineffective ruler. Whatever his other qualities, he faced continual problems in ruling England, as the English nobility had little allegiance towards one they saw as illegitimate. This led to Mortimer’s demise, who was replaced with one of Royal blood, Edward III (a strong leader, who masterminded major conquests in France). The game is designed to reflect this historical reality, and the game works very well with about 1/3 to 1/2 Royalty, and the rest of the rulers with Commoner status (its very flexible). This also adds realism to the map situation. While the average commoner is more than capable of forging a powerful nation, Royalty are somewhat more able to control a larger realm. With this and normal game events, larger realms will arise over time, intermingled with smaller ones. This creates a very interesting situation that corresponds to actual history. Europe has always been divided between smaller realms and larger ones (like larger France bordering smaller Belgium). Commoners and Royalty work very well together as allies, and both can be part of a victorious coalition. So, if you are a commoner, gather together some of your brethren and then kick some butt, and no excuses!
Achieving Victory:
To discover the victory conditions, click on this hyperlink:
http://www.lords-of-conquest.com/victory
Diplomacy:
Diplomacy is important in the game, as it was in the Middle Ages. Try to forge some alliances, or at least non-aggression pacts for some of your borders. If another realm wishes passage through your lands, often the best option is to give them special permission to move through a limited number of provinces (this is one of the location orders). Only give full Passage Rights to a realm that you have complete trust in. Diplomacy may occasionally be erratic and unpredictable though. In the Middle Ages, at various times a ruler would fall in battle, perish by illness, or be overthrown. You will find the same holds true in the game, occasionally there will be a replacement for a neighbouring realm, so be aware of the small possibility that a valued alliance could be undone in a season, as a new ruler arises on your border. Also, another realm may go without orders for a time, and this is completely normal: it simply represents a realm in internal turmoil. This can be an opportunity for you, and be prepared to take advantage of this if possible. However, the great majority of realms will remain under competent rule by those seeking to expand. Be wary in your negotiations, and in defending your borders, as some players may resort to deception and a sudden backstab. As the ruler of your realm, you are also solely responsible for diplomatic relations, and neglecting this important element of rulership can be perilous. To do so is to risk waking up one morning to find your realm besieged by enemies on all sides, without any allies to support you!
Siege Engines doth be most helpful for assaulting heavily defended enemy cities.
Chapter 6: Battles: Mayhem and Destruction
A battle is a hand-to-hand struggle between opposing groups of enemy forces. There are three types of battles:
All battles happen during Movement Events. During Movement Events, units move, then battles occur for locations which have enemy units in them. In real terms, battles represent a struggle between enemy forces that may last a period of days, beginning with initial skirmishes and probing attacks, as the enemy forces make contact. This is followed by a final massive struggle between opposing forces on the battlefield, where one side achieves victory.
When Battles Occur:
Your forces will always attack those of your enemies. This happens automatically when the forces of enemy realms are in the same location. This is why you declare war on other realms, so that you will engage and hopefully vanquish them in battle, and conquer their provinces. For example, when 2 enemy fleets enter the same sea, a sea battle will happen. Also, when you move an army into an enemy land, and there are enemy soldiers there, a battle will happen, etc. Please remember that you will only attack enemies. Therefore, if your allies attack each other, you will not be involved. For cross-border battles, only armies moving across a particular border at the same time are involved (other units moving across other borders, or in the province are not involved). Land and sea battles are described below briefly, and then there is a Battle Notes section which explains things better. This is a lot of reading. The main thing to know is that you will usually be triumphant if you and your allies have superior combat power and Hit-points.
Ctrl+click here to go to Turn Events: Cross Border Battles.
Note: You don’t need to know all of the details about battles. The most important thing to know is to arrange your campaigns so that your forces outnumber the enemy as much as possible. If you outnumber the enemy, you will usually win. That is enough to know for your first few game turns.
Land Battles:
Land battles are fought the same way, whether they are normal province battles or cross-border battles. Fleets and ships will be docked away from the battlefield, so ships will never be involved in a Land battle. Commanders have Hit-points and a combat statistic, and are treated exactly like soldiers for the purpose of battle. Armies will fight normally whether they are loaded onto fleets or not. The steps for resolving this kind of conflict are:
Ctrl+click here to go to Turn Events: Land Battles are Fought.Siege Damage Occurs:
This step is only for a battle in a province where there is a fortification (otherwise it does not apply). Of course, this does not apply for cross-border battles. Various types of troops have Siege Power. This represents the ability to destroy fortification defenses (like Siege Machines hurling large stones to shatter walls, etc.) Of course, troops only attack enemy fortifications, and cause no damage to neutral or allied fortifications. Each troop with Siege Power has one opportunity to increase the Damage level of a fortification +1 per battle (this only happens 1 time before the battle begins). The Siegecraft of the unit leader will increase the Siege Power of troops. For example, Siege Machines have a Siege Power of 50. An army with no commander, and 3 Siege Machines would have 3 attempts to cause damage, and each attempt would have a 50% chance of success (so if you were really lucky, you could increase fortification damage +3, and if unlucky you would cause no damage). The maximum damage that fortifications can have is the fortification level of the province (so, for example, a level 2 fortification could have a max of 2 damage - such a fortification gives no bonus to defenders). After all enemy troops use their Siege Power, fortification damage is assessed. Fortification damage will decrease the bonus gained by defenders (for example, a level 6 fortification with 4 damage would have its effectiveness reduced to a level 2 fortification, because 6-4=2). When a unit successfully increases the damage of a fortification, this will improve the Siegecraft of the unit leader (Siegecraft can only be improved 1 time per turn). Total Siege Power for a soldier is modified by the Siegecraft of the commander, as determined by:
(Siege Power)+(Siege Power)*(Siegecraft)/200%
For example, a soldier has a Siege Power of 30, and the leader of the unit has a Siegecraft of 42. So, the total Siege Power of the soldier will be:
30+30*42/200=36.3
Therefore, the soldier will have a 36.3% chance of causing +1 damage to the fortification (even fractions help a little bit).
Units Commit to Defending Fortifications:
This is only for normal province battles where there is a fortification in the province (not for cross-border battles). This step is to see if any units will commit to defending a fortification or not (they make the final decision after assessing the damage to the fortification). Units gain a bonus if there is a fortification, and they are defending it. Note that Fortification damage only happens prior to battle rounds (it does not happen after units commit to defending fortifications). The bonus will increase their combat, and add Hit-points (the fortification bonus depends on the type of fortification). However, a unit cannot retreat if it defends a fortification. A unit will defend the fortification only if all conditions are met:
Battle Rounds Begin:
Troops Cause Damage:
The first step of a round of battle is for all soldiers to cause damage. All soldiers will cause damage the same way, no matter what rank they are in. All troops in a unit also continue to cause damage against the enemy until the unit retreats, or all friendly troops have been wiped out. Each troop has a Combat, which is the chance of causing 1 damage. Some troops may have more than 1 chance to cause damage. The chance of a troop causing damage is explained better in Battle Notes. Ships are not involved in land battles.
Ctrl+click here to see an example of combat.
Determine Casualties:
Casualties take effect at the end of every second round. They accumulate every round. For each round of the battle, the damage made by troops against the enemy is determined. This damage is added to enemy units. For example, Unit A causes 5 damage, so this 5 damage will be applied to enemy units. The enemy unit that takes the damage depends on which troops are in the front ranks. Troops in front ranks take damage first, and friendly units work together for the purpose of taking damage (friendly means they are owned by the same realm, allied realms, or realms with feudal relations). For example, Unit A only has troops in Rank#3, and friendly Unit B has only troops in Rank#4. Because these 2 units are friendly, Unit A will take full damage before Unit B takes any damage, because Unit A’s troops are in the front ranks, and thus are shielding Unit B.
If a troop has 2.1 hit points, then it will take 3 hits to kill it (if there were 3 of them, it would take 7 hits to kill their combined 6.3 hit points). Fractions are used because troops also gain a bonus from fortifications, which will add fractions.
Casualties are determined every round, but the hits only take effect in removing troops every second round. This means that units eliminated in odd rounds still get to fire in the following round, even if they are technically "killed". Eg attack a peasant, do fifty points of damage, and that peasant is still going to get one more chance to hurt you in the second round before he is removed.
JB: consider this – your foe has a fast moving trooper, about to enter your lands. You have one peasant who can stand in his way. Put the peasant in the second rank, set retreat to first rank. The peasant will engage in one round of combat, then retreat. The peasant may die in the Battle Aftermath, but the battle forces the fast moving foe to stop, and the enemy only has one round in which to inflict the fatal hit that would kill your peasant.Ctrl+click here for more on Determining Casualties.
Units Retreat:
At this point, armies may retreat. If an army is following another unit, it will only retreat when that unit retreats. This is determined by the Follow option of a unit (if the leading unit is not in the battle, then this has no effect). If an army is not following another unit, then it will retreat based on its retreat level. This is explained in Battle Notes. Units that retreat are removed from the battle. The damage caused to the unit will result in casualties, which are listed at the end of the battle.
Battle Continues Or Ends:
If there are still enemy units on the battlefield that are not wiped out, and have not retreated, then battle will continue. In this case, there will be another round of battle. The troops in a unit will all make hits normally, no matter how much damage the unit has taken so far, or what ranks troops are in. This simulates the simultaneous nature of the combat. If all enemy units are wiped out, or have retreated, then the battle will be over. In that case, all troops that are casualties will be determined, and Battle Aftermath will happen (which is explained in Battle Notes).
A troop that takes wounds will have a chance of being destroyed at this time. This is for both the victors and vanquished. For example, if a cavalry unit had only 2 hits made against it, then it is wounded. This is because cavalry have 3 hit points, and so it takes 3 hits to destroy one. A cavalry with 2 wounds would have a 2/3 chance of being destroyed at the end of the battle, regardless of who won the battle.Sea Battles:
Sea battles represent a clash of ships at sea, which involve both seagoing vessels and troops aboard ships that are fighting as marines. The process for resolving sea battles is similar to land battles. Commanders have Hit-points and a combat statistic, and are treated exactly like soldiers for the purpose of battle. The steps for resolving this kind of conflict are:
Battle Rounds Begin:
Troops Cause Damage:
The first step of a round of battle is for all ships and marines to cause damage. Marines are soldiers in armies that are in the Marine Area of the fleet (the amount of marines a fleet can have depends on the total Marine Capacity of the fleet). All marines and ships will cause damage the same way, no matter what rank they are in. Each troop has a Combat, which is the chance of causing damage. Some troops may have more than 1 chance to cause damage. The chance of a troop causing damage is explained better in Battle Notes. All ships and soldiers cause and make hits against each other. You can organize your troops in ranks (like put the ships in the rear, soldiers up front) if you wish. Soldiers are more likely to be taken as casualties
though. Better for them to die fighting than drown when their ship sinks.
Determine Casualties:
For each round of the battle, the damage made by troops against the enemy is determined. This damage is added to enemy units. For example, Unit A causes 5 damage, so this 5 damage will be applied to enemy units. The enemy unit that takes the damage depends on which troops are in the front ranks. Troops in front ranks take damage first, and friendly units work together for the purpose of taking damage (friendly means they are owned by the same realm, allied realms, or realms with feudal relations). For example, Unit A only has troops in Rank#3, and friendly Unit B has only troops in Rank#4. Because these 2 units are friendly, Unit A will take full damage before Unit B takes any damage, because Unit A’s troops are in the front ranks, and thus are shielding Unit B.
Ctrl+click here for more on Causing Damage.
Casualties Are Destroyed:
Casualties are only destroyed on even-numbered rounds (like Round 2, 4, 6, etc., but not 1, 3, 5, etc.) The hits made on odd-numbered rounds are remembered, and will cause casualties on even numbered rounds. For example, you make 3 hits on Round 1, and 4 hits on Round 2. You will not cause any enemy casualties on Round 1, but you will cause 7 damage worth of enemy casualties on Round 2.
Units Retreat:
At this point, fleets may retreat. Armies never retreat from sea battles on their own, they only retreat if the fleet they are loaded onto retreats. If a fleet is following another unit, it will only retreat when that unit retreats. If a fleet is not following another unit, then it will retreat based on its retreat level. This is explained in Battle Notes. The damage caused to the unit will result in casualties, which are listed at the end of the battle. This chance is the same whether a unit is victorious in battle or not. If all ships in a retreating unit are destroyed, then any commanders will automatically transfer to other fleets owned by the same realm (if there is no such fleet available, the commanders will be lost at sea).
Battle Continues Or Ends:
If there are still enemy fleets on the battlefield that are not wiped out, and have not retreated, then battle will continue (armies do not matter for determining whether battle will continue). In this case, there will be another round of battle. If all enemy units are wiped out, or have retreated, then the battle will be over. In that case, all troops that are casualties will be determined, and Battle Aftermath will happen (which is explained in Battle Notes).
Ctrl+click here to go to Turn Events: Sea Battles are Fought.
Battle Notes:
Here are a number of notes regarding battles, where certain things are explained in more depth. Many of these notes apply for all types of battles, so they are listed here to save time
Battle reports:
The battle report shows all of the units in the battle, then the rounds of battle. Here is an example battle report, which you will get on the Messages menu of the Diploware:
A land battle occurred at:Gloucester
[The location of the battle is shown]
The following units were involved:
Patrol Force 2 (Our Army #2), without any modifiers (Total Combat: 200, Total Hit Points: 6)
Independent Army #20, defending the fortifications (with the fortification modifier) (Total Combat: 80, Total Hit Points: 4)
[All units in the battle are shown. The modifiers for the unit are indicated, then the total Combat and total Hit Points of all troops in the unit are shown. This gives you a good idea of the relative strength of the units involved].
The events for Round #1:
[The battle occurs in a number of rounds]
Patrol Force 2 (Our Army #2) (Retreat Level 5):
2 Cavalry Caused 2 Damage
[This unit made 2 hits this round]
Independent Army #20 (Retreat Level 5):
2 Infantry Caused 2 Damage
[This unit made 2 hits also this round]
Unit Status for the End of this Round: #1:
Patrol Force 2 (Our Army #2) suffered 2 damage (Total Hit Points: 6, Total Damage Taken: 2)
Independent Army #20 suffered 2 damage (Total Hit Points: 4, Total Damage Taken: 2)
[This shows the damage sustained by all units for this round, and the total hit points that each unit has. For example, Patrol Force 2 has 6 hit points, and has taken 1 damage].
Casualties: None (this is not a casualty round)
[Casualties are only taken on even numbered rounds. So the damage done in Round#1 will cause casualties in Round#2. Any retreats will happen at the end of a round, but there are none in this battle. A unit that successfully retreats will not suffer any additional damage in additional rounds of battle].
The events for Round #2:
[This is the next round, Round 2]
Patrol Force 2 (Our Army #2) (Retreat Level 5):
2 Cavalry Caused 2 Damage
[Both cavalry made hits again]
Independent Army #20 (Retreat Level 5):
2 Infantry Caused 1 Damage
[The infantry made 1 hit this time]
Unit Status for the End of this Round: #2:
Patrol Force 2 (Our Army #2) suffered 1 damage (Total Hit Points: 6, Total Damage Taken: 3)
Independent Army #20 suffered 2 damage (Total Hit Points: 4, Total Damage Taken: 4)
[Now, the total hit points and damage taken is shown, as it is the end of round#2. Patrol Force 2 is still alive, but Independent Army#20 will be wiped out, because the damage taken is the same as the hit points of the unit].
Casualties for Round #2:
Patrol Force 2 (Our Army #2) suffered 3 damage, with these losses:
1 Cavalry (Hit Points: 3) is killed, 0 more Damage remains
[The damage this unit sustained in Round 1 and Round 2 now causes casualties, which results in 1 cavalry being destroyed].
Independent Army #20 suffered 4 damage, with these losses:
2 Infantry (Hit Points: 2) are killed, 0 more Damage remains
[The damage this unit sustained in Round 1 and Round 2 now causes casualties, which results in 2 infantry being destroyed].
The battle has ended.
[The battle is now complete, because there are no hostile forces remaining in this location. The independent army was wiped out, and this leaves Patrol Force 2 holding the field, victorious].
[Any Wounded Troops are now listed, and whether they are destroyed or not. There are no wounded troops in the battle. A troop that takes wounds will have a chance of being destroyed at this time. This is for both the victors and vanquished. For example, if Patrol Force 2 had only 2 hits made against it, then it would have a cavalry with 2 wounds. This is because cavalry have 3 hit points, and so it takes 3 hits to destroy one. A cavalry with 2 wounds would have a 2/3 chance of being destroyed at the end of the battle, regardless of who won the battle].
Ctrl+click here to go to Battles: Troops Determine Casualties.
Causing Damage:
In a battle, each troop (soldier or ship) has a chance of causing damage to enemy troops (some troops have more than 1 chance). Commanders cause damage exactly like soldiers do (this represents the commander’s personal guard). In a land battle, causing damage could represent a regiment of cavalry charging down against the foe and severely mauling them. In a sea battle, causing damage could represent a squadron of galleys bearing down on enemy vessels, ramming or boarding them, thus damaging some and sinking others. All troops in a battle will cause damage, no matter what rank they are in. The chance of a troop causing damage depends on the Combat of the troop. For example, a combat of 30 would mean a 30% chance of causing damage. Most troops only have 1 chance to cause damage, but some troops may have more chances. For example, a troop with 2 chances to cause damage, and a combat of 20, would have 2 attempts to cause damage, each with a 20% chance of success (the troop could actually cause 2 damage if it was really lucky). The combat of a troop has various modifiers. If the modified Combat is 100 or greater, then it will be reduced to 99 (there is a maximum of a 99% chance of success).
The combat of a troop may have modifiers, based on the situation of the troop in the battle. To determine the total combat of a troop, after all modifiers, see the following list:(the soldier was not landed amphibiously, is not defended by a fortification, and is not fighting in a sea battle):
The Marine Modifier is only for soldiers that are involved in a sea battle (not for land battles). This represents the effectiveness of the soldier type in storming enemy vessels (cavalry usually have a sizeable negative modifier for this, because they will be dismounted when fighting as marines). Only the soldiers fighting as Marines gain this modifier. The maximum number of marines that a fleet has room for is the total Marine Capacity of all ships in the fleet. This is different for each type of soldier (there is a big negative for cavalry, who will be dismounted during sea engagements) For example, if the marines modifier was -50%, then you would multiply the combat by 0.5.
(The fortification modifier is explained further down).
The Amphibious Modifier is used when the soldier has been unloaded onto an enemy province. This represents the decrease in combat effectiveness soon after the soldier has been landed onto enemy territory (the unit will generally be unloaded on poor defensive coastland, horses are weakened from the sea voyage, etc.) This only affects the troops that have been unloaded from fleets onto an enemy province, and only for the phase that they are unloaded on (unloading onto friendly provinces has no effect). For other phases of the same turn, this modifier is not used. For example, if the amphibious modifier was -25%, then you would multiply the combat by 0.75. If the amphibious modifier was +10%, then you would multiply the combat by 1.1.
Ctrl+click here to go to Battles: Land Troops Cause Damage.
Ctrl+click here to go to Battles: Sea Troops Cause Damage.
Commander Modifier:
The Commander modifier is determined by the commander that is the leader of the unit. If there is no leader, then of course there is no modifier. This is for both soldiers and ships. Each Commander in the game has a rating in 4 types of tactics: Infantry, Cavalry, Siege, and Naval Tactics. Each troop gains a bonus based on the Tactics of the commander that is the leader of the unit (any other commanders not leading the unit give no bonus). The tactics bonus is determined by:
(Combat)*(Tactics)/(Number)
For example, a troop has a Combat of 30, and is a Foot type. The leader has a rating of 46 for infantry tactics. There is no fortification involved, so the Number is 200. Therefore, the bonus for the troop will be: 30*46/200=6.9 (even fractions help out a little bit). If the normal combat of the troop was 30, then the combat will now be 30+6.9=36.9, so the troop will have a 36.9% chance of causing damage. A different modifier would be gained by Mounted type troops in the same unit.
If the commander had a +20 modifier for mounted troops, then a Crusader Knight (combat 90%, or 2x45%) will improve by 9%. 90*20/200=9 90+9=99% But remember Crusader Knights have two hits at half their total, so it will actually be 2x 49.5%
Other armies in the same province are not affected by a commander. Only the troops in the same army as the commander can gain the benefit of the commander’s modifier.
Ctrl+click here to go to Details: Commanders.
Fortification Modifier:
If a soldier is defending a fortification in a battle, he will receive a modifier. This is not for Ships or for cross-border battles. The fortification modifier represents a soldier’s greater effectiveness against other soldiers (for example, a defender pouring boiling oil on the poor bastards trying to climb up siege ladders). Cavalry receive a much smaller modifier than other troops, as they have difficulty bringing their mounted strength to bear (although they are assumed to be sallying forth at times during the battle). The number of troops that gains the fortification bonus is different for each type of fortification, and is based on the Barracks space (this represents the limited space for defending the fortification at the same time, other troops must sally outside to bring their strength to bear). For example, if a type of fortification had Barracks Space of 10 troops, then only 10 troops would gain the modifier each round, and others would not (the troops are randomly determined). Soldiers in garrisons will always defend the fortification. For armies, this depends on their standing orders. An army with standing orders to defend fortifications will defend if the fortification is not ruined. An army with standing orders to remain outside of fortifications will never defend fortifications. In addition, the province must be owned by you or an ally. The modifier gained depends on:
(Fort Level-Damage)
For example, a fortification of level 8 that had 2 damage would be the same as a level 6 fortification (8-2=6). Each level of fortification has a different bonus for Infantry and cavalry. For example, a fortification is Level 5, with 3 damage, 5-3=2, so the benefit will be for Fortification Level 2. Fortification Level 2 gives a combat bonus of +50% for Foot soldiers. A Foot soldier defending the fortification with a normal combat of 40 would have its combat increased to 40+50%=60.
Ctrl+click here to go to Details: Fortifications.
Whoever owns the province at the end of the phase before the invasion (and his allies) will be protected by the fortifications. If you have two allies, and they are at war with each other in your fortified province, they can both get the benefit of your defences.
If the province changes ownership in a phase, then the new owner gains the defensive bonus. The old owner would then become the invader if his troops arrived in the province in a later phase of the same turn.
Commanders in Battle:
Each commander has a Hit-points and combat statistic, which is usually small, and represents the small cadre of the commander’s personal guards and retinue. Commanders act exactly like soldiers in all battles, as well as giving the leader bonus to a unit. Commanders are always in Rank#5 (reserves), so they will be taken as casualties last, no matter what. The commander will only affect the troops of the army he is in. He will not affect other armies in the same province, neither will he affect the troops of your allies. If you had several troops in the fifth rank, and the commander is killed, the remaining troops will act as though they have no commander.
Ctrl+click here to go to Details: Commanders.
Hit-points:
Each troop has a Hit-points rating. This represents the constitution of the troop; how difficult it is to destroy. For example, heavy infantry represent a hardened band of well-armoured foot troops, which would be more difficult to destroy than lightly armed peasants - accordingly, the heavy infantry have more Hit-points. Hit-points determine how much damage a troop can take before it is destroyed in battle. For example, a troop with 2 Hit-points would take 2 damage to destroy.
Fortification Hit-point Bonus:
Each type of soldier will gain a Hit-point bonus when defending a fortification, based on the fortification type, and the type of soldier. This is only gained by a soldier defending a fortification (this is not for Ships or cross-border battles). The troops that will gain the bonus depends on the Barracks space of a fortification. For example, if the barracks space was 12, then only the first 12 casualties would gain the Hit-points bonus, other casualties would only have their normal Hit-points. The Hit-point bonus gained depends on the type of troop. Each fortification gives a different Hit-point bonus, based on the type of soldier. For example, a Fort Level gives 0.5 Hit-point bonus to cavalry, and 1.3 Hit-point bonus to Foot. So, a cavalry troop that had normal Hit-points of 3 would have 3+0.5=3.5 Hit-points when defending the fortification, and a foot troop that had normal Hit-points of 1 would have 1+1.3=2.3 Hit-points when defending the fortification.
Ctrl+click here to go to Details: Fortifications.
About Retreating:
At the end of each round of battle, units may retreat. Only armies and fleets can retreat (not garrisons). Also, armies that are defending a fortification (based on the Defend Fortifications Option) cannot retreat, as they are within the fortification walls, surrounded by the enemy. For each army and fleet, there is a Retreat Level. If a unit is following another unit, then it will ignore the retreat level, and only retreat if the leading unit retreats (but only if the leading unit is involved in the battle, otherwise it is ignored). If a unit is not following another unit, then the retreat level is used. So, as you can see, following takes precedence over the retreat level: this allows you to have all your units retreat at the same time if you wish (if all units are following the same leading unit, then they will all retreat when the leading unit does). This is a rank from 1 to 5. If all troops in this rank and all lowered numbered ranks are casualties, then the unit will attempt to retreat. If at least 1 troop in this rank or any lower-numbered rank is not a casualty, then the unit will not attempt to retreat. For example, the retreat level is 3, so the unit will attempt to retreat when all troops are casualties in ranks 1, 2 and 3. When a unit attempts to retreat, it will try to move to a connected location. An invading army will try to retreat to the province it invaded from. An army can only retreat to a province that you have Permission for, and which has no enemy troops. If following, a unit will retreat to the same location as the leading unit, if possible. Otherwise, a unit will attempt to move back to the location where it came from. For a cross-border battle, there is no retreat location needed, because a retreating unit will simply remain where it was before invading across the border. If an army takes heavy damage during a round of battle, it may have casualties in ranks lower than the retreat rank (or, it may possibly be wiped out in a round before it can retreat). In such a case, a unit will retreat as soon as it can. So, if a unit had all troops in Rank#1, and a retreat level of 1, the unit might still be destroyed if all troops became casualties in the first round of battle. When a unit successfully retreats:
W
ORKING WITH AN ALLY:When you go to war, working with an ally against a common foe, there are some things to be aware of.
Your troops work as though part of the same nation. If all your troops are in the first rank, and all your ally’s troops are in ranks two to five, all of your troops will take damage before any of your ally’s. It’s worth your while to discuss how all your troops will be ranked. There’s usually no point losing your knights to protect your ally’s peasants.
Breaking up with an ally:
There are a few things you should know about what happens when you break up with an ally.
1) If your ally goes neutral with you, there’s a good chance you’ll be at war the turn after. If you gave your ex-ally passage rights, there’s a good chance you’ll find foreign troops roaming through your lands. The lands will still belong to you this turn, but next turn when war is declared, you’re likely to lose those lands, and the ones near to them. If your troops are near the enemy, then combat will not immediately occur – examine the turn event list, and you’ll see that there will be a phase of movement before combat and province ownership changes – your troops will get the chance to move and engage or evade the enemy. Finally, if your troops are moving through their lands, and they withdraw passage rights from you, then your troops will be stuck if there is no neighbouring province they can move to. Your only options here are to ask for passage rights to be returned, or go to war, or have another player with whom you have passage rights to attack an adjacent province.
2) If you’re doing the stabbing, then there are a few things to remember. Get as many of your troops marching through your victim’s lands, so that next turn you can take as much of his land as possible, ruining his economy. Try to ensure you get your victim’s cities, so that he can’t build new troops to fight you. And remember that ownership change does not occur before movement, so you may want to hold position for a phase in the next turn when you declare war, so that you conquer the lands you have moved onto during the turn you went neutral. Also remember to withdraw passage rights from your ex-ally in the same turn you go neutral. This plan, by the way, is very nasty, and likely to get your victim very hot under the collar. But if you’ve ruined his economy and can defeat his army, you only have to worry about the envious glances you’re getting from every other player in the game. J
3) If your allies break up, and you are still allies with them, then in any fights where your troops are present, your troops will not fight either of them. Your troops will watch the battle, because you are not at war with either of the combatants. If they fight in your fortified province, they could both get the benefit of your fortifications!
Battle Aftermath:
When battle ends, these events happen:
Choose wisely thy forces, keeping in mind the task at hand.
Chapter 7: Troops
There are different troops in the game. These can be built in garrisons where there is a population center (use Map Options to show population centers on the diploware). Each population center has different troops available, based on the region (for example, Longbowmen can only be raised in some English cities, while Berber Warriors are only found in some parts of North Africa). If you would like a printout that gets them all on one A4 page, look for it just before the FAQ at the end of the document.
Some notes about troops are:
1) All mounted troops (and Siege Machines) have a weight of 2, while all infantry have a weight of 1.
2) All troops have an amphibious modifier of -30% for amphibious invasions, except for certain types of infantry.
3) All cavalry have a marine modifier of -50%.
4) All foot troops can be involved in naval battles, where they fight as marines aboard ship. In such battles, all infantry (including mounted infantry) have a marine modifier of -30%, except for certain types of infantry. Archers have only a -10% modifier.
5) All ships and siege machines can be salvaged for materials, which yields gold in the amount of about 1/3 of the build cost.
5) Transport ships and Siege Engines have a 20% chance of capture in battle, while warships have a 10% chance of capture. Only troops that are casualties can be captured, and only the victors of the battle capture troops.
6) All troops have 1 attack in battle, except for heavy mounted troops and the heaviest ships, which have 2 attacks. This is shown in parentheses, like (2X40) means 2 attacks with a combat of 40% (which is almost the same as a combat of 80%). Such a troop could make 2 hits in 1 round of battle.
Troops of the West:
These are the various troops of the western realms, which include the Byzantine Empire and Hungary.
|
Type |
Combat % |
Hit Points |
Move Points |
Build Cost |
Upkeep |
|
Peasant Rabble |
13 |
0.9 |
2 |
2 |
.2 |
|
Militia |
21 |
1 |
2 |
3 |
.3 |
|
Men-at-Arms |
25 |
2 |
2 |
5 |
.4 |
|
Light Infantry |
23 |
2.1 |
2 |
5 |
.4 |
|
Elite Marines |
30 |
2.3 |
2 |
6 |
.4 |
|
Archers |
42 |
1 |
2 |
4 |
.3 |
|
Crossbowmen |
48 |
1 |
2 |
4 |
.4 |
|
Longbowmen |
60 |
1 |
2 |
5 |
.3 |
|
Heavy Infantry |
34 |
3 |
2 |
7 |
.4 |
|
Nordic Warriors |
37 |
3 |
2 |
8 |
.3 |
|
Mercenaries |
35 |
3.3 |
2 |
8 |
.5 |
|
Imperial Guards |
38 |
3.5 |
2 |
8 |
.4 |
|
Type |
Combat % |
Hit Points |
Move Points |
Build Cost |
Upkeep |
|
Light Cavalry |
56 |
1.1 |
3 |
6 |
.4 |
|
Mounted Infantry |
52 |
1.1 |
3 |
6 |
.4 |
|
Heavy Cavalry |
70 (2X35) |
2 |
3 |
8 |
.5 |
|
Spanish Knights |
84 (2X42) |
2 |
3 |
9 |
.5 |
|
French Knights |
86 (2X43) |
2 |
3 |
9 |
.5 |
|
German Knights |
88 (2X44) |
2 |
3 |
9 |
.5 |
|
Crusader Knights |
90 (2X45) |
2.1 |
3 |
9 |
.5 |
Troops of the East:
These are the troops of the realms of Eastern Europe.
|
Type |
Combat % |
Hit Points |
Move Points |
Build Cost |
Upkeep |
|
Villager Conscripts |
16 |
1 |
2 |
3 |
.3 |
|
Light Spearmen |
28 |
2 |
2 |
5 |
.4 |
|
Archers |
42 |
1 |
2 |
4 |
.3 |
|
Boyar Guards |
36 |
3 |
2 |
7 |
.4 |
|
Light Cavalry |
56 |
1.1 |
3 |
6 |
.4 |
|
Slavic Nobles |
82 (2X41) |
2 |
3 |
9 |
.5 |
Muslim Troops:
These are the troops of the Muslim realms, in North Africa and the Middle East.
|
Type |
Combat % |
Hit Points |
Move Points |
Build Cost |
Upkeep |
|
Arab Footmen |
18 |
1 |
2 |
3 |
.2 |
|
Muslim Swordsmen |
24 |
2 |
2 |
5 |
.4 |
|
Berber Warriors |
26 |
2 |
2 |
5 |
.3 |
|
Muslim Skirmishers |
44 |
1 |
2 |
4 |
.3 |
|
Saracen Guards |
31 |
3 |
2 |
7 |
.4 |
|
Nomads |
14 |
1 |
4 |
3 |
.3 |
|
Arab Lancers |
49 |
1.2 |
3 |
6 |
.3 |
|
Muslim Mounted Archers |
74 (2X37) |
1.3 |
3 |
7 |
.4 |
Mongol Troops:
These are the troops of the Golden Horde, which lies above the Black Sea.
|
Type |
Combat % |
Hit Points |
Move Points |
Build Cost |
Upkeep |
|
Horde Warriors |
25 |
2.5 |
2 |
6 |
.4 |
|
Mongol Bowmen |
40 |
1 |
2 |
4 |
.2 |
|
Mongol Raiders |
16 |
1 |
4 |
3 |
.2 |
|
Mongol Horse Archers |
82 (2X41) |
1.5 |
4 |
8 |
.3 |
Siege Machines:
These are used for damaging enemy fortifications, and are built by all Realms:
|
Combat % |
Hit Points |
Move Points |
Build Cost |
Upkeep Cost |
|
5 |
0.5 |
2 |
6 |
.2 |
|
Fortification level |
Total of units able to be defended by this level |
Combat attack bonus given to infantry units in the fortification |
Hit point bonus given to infantry units in the fortification |
Combat attack bonus given to cavalry units in the fortification |
Hit point bonus given to cavalry units in the fortification |
|
1 Palisade Fort |
3 |
45% |
0.7 |
15% |
0.3 |
|
2 Motte+Bailey |
6 |
47% |
0.9 |
17% |
0.5 |
|
3 Stone Tower |
9 |
49% |
1.0 |
19% |
0.6 |
|
4 Stone Keep |
12 |
51% |
1.2 |
21% |
0.7 |
|
5 Hillfort |
15 |
53% |
1.3 |
23% |
0.9 |
|
6 Border Fort |
18 |
55% |
1.5 |
25% |
1.0 |
|
7 Stronghold |
21 |
57% |
1.6 |
27% |
1.1 |
|
8 Fortress |
24 |
59% |
1.8 |
29% |
1.3 |
|
9 Heavy Fortress |
27 |
61% |
1.9 |
31% |
1.4 |
|
10 Castle |
30 |
63% |
2.1 |
33% |
1.5 |
|
11 Reinforced Castle |
33 |
65% |
2.2 |
35% |
1.7 |
|
12 Citadel |
36 |
67% |
2.4 |
37% |
1.8 |
Ships:
Ship Types vary throughout Europe.
|
Type |
Combat % |
Hit Points |
Move Points |
Build Cost |
Upkeep Cost |
Marine Space |
Storage |
|
Trading Cog |
14 |
1 |
2 |
4 |
.2 |
0 |
2 |
|
Merchantman |
20 |
1 |
2 |
4 |
.2 |
0 |
2 |
|
Light Dromond |
42 |
1 |
3 |
4 |
.2 |
0 |
0 |
|
War Dhow |
50 |
2 |
3 |
6 |
.3 |
1 |
1 |
|
Bergantina |
54 |
2 |
3 |
6 |
.3 |
1 |
1 |
|
Medium Galley |
56 |
2 |
3 |
6 |
.3 |
1 |
1 |
|
Arab War Galley |
76 (2X38) |
3 |
2 |
9 |
.4 |
2 |
2 |
|
Carrack |
80 (2X40) |
3 |
2 |
9 |
.4 |
2 |
2 |
|
Royal Galleon |
86 (2X43) |
4 |
2 |
10 |
.5 |
2 |
2 |
The locations of the 23 realms.
There are 23 realms in the game. Each player inherits the throne of a random realm. The different realms begin in a roughly equal standing. You can strengthen your position by allying with your local neighbours, but do not leave yourself undefended. Also, be sure to leave yourself a route of expansion, as you will need to vanquish a swath of territory in order to claim victory. There are many independent provinces, that claim loyalty to no realm (these will attack intruders).
If a realm is controlled by Local (or "independent") Forces, this means the computer is in control. Such a realm will build troops and defend its lands. It will only attack provinces that are annexed to it, no others. It won’t change its existing diplomatic relations. Even if you are at war with such a realm, it won’t invade provinces unless they are annexed to its realm.
The organized realms (which have players) are:
This is Ye olde Kingdom of England, lying far to the northwest. The first step should be to consolidate the British isles, yet the realm holds claim to large holdings in France...
The ruler of Paris and the interior of France, the Kingdom has many expansion opportunities, and a stout standing army. Although holding the Ile de France (Isle of France), the King may unite the French-speaking provinces by skilful diplomatic manoeuvring and hard campaigning.
At one point a vassal of France, and later that of England, the Dukes of this realm often act independently of either throne. The lucrative wine trade from Bordeaux has filled their coffers, and made them lords of southern France.
This formidable kingdom in Western Spain has a secure position from which to expand. The past century has seen the decline of the great Muslim realms, which now have only a foothold in southern Spain. Yet Castile faces a rival in the Kingdom of Aragon for control of the Iberian Peninsula.
This strong realm in Eastern Spain sits on the trade route to southern France, and vies with Castile for control of the Iberian Peninsula.
Although nominally a part of the Holy Roman Empire, the Kingdom of Arles maintains its independence in Northern Italy. The Kingdom is the strongest power in Italy and Eastern France, holding sway over a large region.
This Kingdom is largely isolated in the far north, with good expansion opportunities into Sweden, which is a weaker and less organized domain.
The Danes rule a warlike trading kingdom in the north, holding sway over much of Scandinavia. They also have strong ties to eastern Europe. These descendants of the Vikings still yearn for lands and Conquest, with many shipping routes available to their forces.
The Duchy of Bavaria is the second group of German states that comprise the Holy Roman Empire. The empire, which has been termed "neither holy, nor Roman, nor an empire" remains an objective for the land-hungry German lords. Bavaria leads an alliance of states in the south-east of Central Europe, and maintains a rivalry with Saxony, its northern neighbour, for the dominance of Germany.
Lying in the north of Europe, Saxony leads the third group of German states, locked in rivalry with Bavaria for dominance in Germany.
Better Known as the Kingdom of the 2 Sicilies, this domain on the Southern Italian peninsula was carved out by Norman adventurers some time ago. The Kingdom maintains a major naval presence in the Mediterranean, and has a great deal of security from land-based invasions (though vulnerable to sea-borne assaults). The first task should be to bring a host to the gates of Rome, and thus secure a Papal blessing by bringing Rome under his dominion.
This prosperous Italian trading republic generates a great deal of wealth trading all manner of goods throughout the Mediterranean. Venice has many opportunities to expand through naval might, yet it must keep a wary eye to the Germans in the north. The capital of Venice is a tempting target, with its vast revenue-producing potential.
This powerful order of knights field the mightiest of troops, the Teutonic Knight. These monk-warriors have sworn to bring the Faith to the pagan tribes of Eastern Europe, by sword if necessary, and have carved out a mighty realm in the region.
the Grand Duchy of Poland: (Pol)
Poland lies on one of the main invasion routes of Europe. This is a challenging position, with several threats; but the Duchy also has an excellent potential for expansion. The Grand Duke should consider carefully which alliances will do the most to increase his security.
Hungary is a mighty power in the Central European region. The kingdom is united under the leadership of its sovereign, supported by the Magyar nobles, with many paths of conquest available.
Though fallen from its previous glory, this remnant of the former Roman Empire still maintains great strength, cantered around its capital of Byzantium, the largest and wealthiest city in Europe. A talented ruler may yet return the Empire to its days of glory.
the Principality of Lithuania: (Lit)
The Principality, a powerful conglomeration of Lithuanian tribes, holds sway over a large region in the East. The Grand Prince has many opportunities for expansion, yet must also be wary of invasions from several possible threats.
the Republic of Novgorod: (Nov)
The Republic lies to the far northeast of Europe. Ruled by a popular assembly (the "Veche"), a Grand Duke is elected at various periods. Novgorod is a bustling trading centre well protected in the north, with shipping routes across the Baltic.
This realm represents the westernmost forces of the Golden Horde, a great Mongol empire, stretching eastwards. The Horde sends forth its feared Mongol mounted archers in raiding expeditions. These hairy riders are the bane of villagers throughout the east.
This Turkic realm commands a mighty war machine, yet it has recently been greatly weakened by Mongol incursions far to the east. Nevertheless, the Sultanate maintains a well-protected position on the Anatolian Peninsula, and is in a good position to expand outwards.
These rulers of Egypt and the surrounding lands of the Middle East are a formidable force. The Sultan has many opportunities for conquest, against both the infidel and any others in their way.
This Caliph, ruling from his seat in Tunis, has an excellent defensive position, with many opportunities for expansion over Northern Africa, as well as the Mediterranean.
the Sultanate of Morocco: (Mor)
This realm, ruled by the Marinid dynasty, lies to the far southwest of the map. From their base in Fez, these Berber lords have established a protectorate over parts of Spain. The Sultan will need to keep his Spanish possessions secure,
while expanding in Northern Africa.
Warships doth be essential for supremacy at sea.
"What to do when you’re new"
Here is a checklist of things to do when you’ve got your first turn.
Here are some ideas to consider regarding strategy, and how to play a strong game.
The most successful players are those that have long-range plans. Although things probably won’t go exactly as you planned, it is best to think several turns down the road. The events of 1 turn will not decide the outcome of the game, so you can afford an unexpected lost troop here or there. Victory will be decided over the long haul.
You can gain income from any province you pillage. This is useful if you do not expect to own a province for a long time, or if you have Commoner status. Commoners should annex only their most valuable provinces, and pillage the others. It takes a unit with at least 10 combat to pillage.
Early in the game, there are many opportunities to expand into neighbouring provinces. But negotiate with your neighbours, to avoid an early war. Try to divide the provinces in a way that makes your valued neighbours happy.
Put Your Worst Troops Up Front:
Each army has a number of ranks. Use these to place your worst troops (that you can afford to lose) in the lowest numbered ranks (like Rank 1 or 2). Keep your best troops in the back (in Rank 4 or 5). Troops will fight the same in any rank, so you can keep your valuable hitters in the rear, screened by your fodder troops.
For hitting a tough foe, it is best to do so with overwhelming force. The fewer the rounds of battle, the less casualties you will have. So, try to wipe him out in the first round. You can send armies from multiple directions to converge at the battlefield. Just remember to make sure that they all have enough Move Points to make it, and you Hold Position if needed to synchronize their movement. Whether your forces are in 1 army or 2 armies, it won’t matter for taking losses. For example, if you have an army #1with 5 troops in rank 1, and army#2 with 1 troop in rank 2, army#1 will lose all of its troops first (the ranks work together). This works the same way with your allies (if you have an Alliance with another realm, your troops will also take losses as if you were in the same realm). With this in mind, beware of an ally asking you to help in an attack, while he puts all of his troops in the rear ranks, so that you will take all of the casualties!
Each realm has various troops available to it. All are useful. Troops with more Move Points can move into a friendly province and attack on the same turn. So, you can build them as reinforcements for an attack you will make. Slower troops are not able to move and attack the same turn (it takes 1 Move Point to move through a friendly province, and you need 2 to attack an enemy province). Also, use the heavy defensive troops in front. This can result in not sustaining losses during a battle. For example, a Man-at-Arms has 2 hit points. If you were in a battle with only Man-at-Arms in Rank#1, and received 3 hits, you would only lose 1 Man-at-Arms (the other hit would not affect you). The Heavy Infantry has a special advantage for this. Balance your attacks with enough hitting power in the rear ranks with enough cheap troops in the front ranks. Also, remember that when you have a large number of troops, upkeep costs will become a significant expense. If you are going to maintain a large force for a while that won’t see action, it is better to build the more expensive heavy defensive troops (like a Man-at-Arms or Heavy Infantry, for example). This is because the upkeep is half the cost for the equivalent battle strength in weaker troops.
Beware to whom you tell your plans to. Your trusted ally may be a double-agent for the opposition. Also, turns may possibly be delayed due to circumstances beyond the GM’s control. If this should occur, turnfiles may (but not necessarily) be accepted after the deadline. So, beware of telling anyone anything about your plans until AFTER you have received your new turn. If you divulge your plans, they may find their ways to the ears of your sworn enemies, who may then send in a late turnfile that could possibly be accepted. Usually, turns will not be accepted, but again, this is a matter of the GM’s discretion.
Send Your Turn In Early & Often:
You can send in a turn early, and you can send another turn in later if you change your plans. Of course, try not to send in 10 turns, because this will get a little old for the GM. But, 2 or 3 turns are acceptable. Getting that first turn in early could make a big difference if you should forget (or if you face a power outage that prevents you from getting your turn in later). In the long run, 1 missed turn will have very little effect on your success. Time and time again, it has been proven that those who are most successful are those who consistently work to improve their position over the long haul. History teaches that 1 lost battle means little to a skilled, intrepid leader who has the endurance and fortitude to fight on (for example, Alfred the Great, George Washington, all of the victorious powers in the world wars, etc.) This is the spirit of sportsmanship that PBeM games are all about.
JB: These 2 pages are well worth printing out. It shows things like, "Why doesn’t my alliance take effect at the start of the turn before my troops start moving into my ally’s lands?" and "Why can’t I walk through my ally’s lands – he just ordered passage rights for me!" The second page will help you work out your chances of winning battles – every veteran pays careful attention to this info. What should I build…..
War Declared
Acceptance Changed
Passage Rights Changed
Special Permission Changed
New Armies Formed
New Fleets Formed
Various Administrative Actions Performed
Same Location Transfers Occur
Troops Reassigned to Ranks
Disbanding/Salvaging Troops
Movement Events:
Transfers Happen
Armies Prepare to Board Foreign Fleets
Fleets Load Armies
Fleets Set Sail
Homeless Fleets Depart
Sea Battle Are Fought
Fleet Storage Checked
All Armies Unloaded onto Provinces
Armies March
Defend Fortifications Option Changed
Cross-border Battles Are Fought
Land Battles are Fought
Province Ownership Changes
Provinces are Pillaged
Movement Events Repeat
Final Events:
Province Damage Increases
Gold Sent
Upkeep Paid
Troops Built
Commanders Hired
Provinces Annexed
Province Annexation Declines
Construction Happens
Gold Decay
Structures Razed
Province Revenue Gained
Provinces Gifted
Proclamations Income
Province Damage Repaired
Peace Established
Alliances Cancelled
Alliances Formed
Realm Limits Checked
Defeated Realms Removed
Turn Events Are Complete
These are the various troops of the western realms, which include the Byzantine Empire and Hungary.
|
Type |
Combat % |
Hit Points |
Move Points |
Build Cost |
Upkeep Cost |
|
Peasant Rabble |
13 |
0.9 |
2 |
2 |
.2 |
|
Militia |
21 |
1 |
2 |
3 |
.3 |
|
Men-at-Arms |
25 |
2 |
2 |
5 |
.4 |
|
Light Infantry |
23 |
2.1 |
2 |
5 |
.4 |
|
Elite Marines |
30 |
2.3 |
2 |
6 |
.4 |
|
Archers |
42 |
1 |
2 |
4 |
.3 |
|
Crossbowmen |
48 |
1 |
2 |
4 |
.4 |
|
Longbowmen |
60 |
1 |
2 |
5 |
.3 |
|
Heavy Infantry |
34 |
3 |
2 |
7 |
.4 |
|
Nordic Warriors |
37 |
3 |
2 |
8 |
.3 |
|
Mercenaries |
35 |
3.3 |
2 |
8 |
.5 |
|
Imperial Guards |
38 |
3.5 |
2 |
8 |
.4 |
|
Light Cavalry |
56 |
1.1 |
3 |
6 |
.4 |
|
Mounted Infantry |
52 |
1.1 |
3 |
6 |
.4 |
|
Heavy Cavalry |
70 (2X35) |
2 |
3 |
8 |
.5 |
|
Spanish Knights |
84 (2X42) |
2 |
3 |
9 |
.5 |
|
French Knights |
86 (2X43) |
2 |
3 |
9 |
.5 |
|
German Knights |
88 (2X44) |
2 |
3 |
9 |
.5 |
|
Crusader Knights |
90 (2X45) |
2.1 |
3 |
9 |
.5 |
These are the troops of the realms of Eastern Europe.
|
Type |
Combat % |
Hit Points |
Move Points |
Build Cost |
Upkeep Cost |
|
Villager Conscripts |
16 |
1 |
2 |
3 |
.3 |
|
Light Spearmen |
28 |
2 |
2 |
5 |
.4 |
|
Archers |
42 |
1 |
2 |
4 |
.3 |
|
Boyar Guards |
36 |
3 |
2 |
7 |
.4 |
|
Light Cavalry |
56 |
1.1 |
3 |
6 |
.4 |
|
Slavic Nobles |
82 (2X41) |
2 |
3 |
9 |
.5 |
These are the troops of the Muslim realms, in North Africa and the Middle East.
|
Type |
Combat % |
Hit Points |
Move Points |
Build Cost |
Upkeep Cost |
|
Arab Footmen |
18 |
1 |
2 |
3 |
.2 |
|
Muslim Swordsmen |
24 |
2 |
2 |
5 |
.4 |
|
Berber Warriors |
26 |
2 |
2 |
5 |
.3 |
|
Muslim Skirmishers |
44 |
1 |
2 |
4 |
.3 |
|
Saracen Guards |
31 |
3 |
2 |
7 |
.4 |
|
Nomads |
14 |
1 |
4 |
3 |
.3 |
|
Arab Lancers |
49 |
1.2 |
3 |
6 |
.3 |
|
Muslim Mounted Archers |
74 (2X37) |
1.3 |
3 |
7 |
.4 |
These are the troops of the Golden Horde, which lies above the Black Sea.
|
Type |
Combat % |
Hit Points |
Move Points |
Build Cost |
Upkeep Cost |
|
Horde Warriors |
25 |
2.5 |
2 |
6 |
.4 |
|
Mongol Bowmen |
40 |
1 |
2 |
4 |
.2 |
|
Mongol Raiders |
16 |
1 |
4 |
3 |
.2 |
|
Mongol Horse Archers |
82 (2X41) |
1.5 |
4 |
8 |
.3 |
These are used for damaging enemy fortifications, and are built by all Realms:
|
Combat % |
Hit Points |
Move Points |
Build Cost |
Upkeep Cost |
|
|
Siege Machine |
5 |
0.5 |
2 |
6 |
.2 |
Ship Types vary throughout Europe.
|
Type |
Combat % |
Hit Points |
Move Points |
Build Cost |
Upkeep Cost |
Marine Space |
Storage |
|
Trading Cog |
14 |
1 |
2 |
4 |
.2 |
0 |
2 |
|
Merchantman |
20 |
1 |
2 |
4 |
.2 |
0 |
2 |
|
Light Dromond |
42 |
1 |
3 |
4 |
.2 |
0 |
0 |
|
War Dhow |
50 |
2 |
3 |
6 |
.3 |
1 |
1 |
|
Bergantina |
54 |
2 |
3 |
6 |
.3 |
1 |
1 |
|
Medium Galley |
56 |
2 |
3 |
6 |
.3 |
1 |
1 |
|
Arab War Galley |
76 (2X38) |
3 |
2 |
9 |
.4 |
2 |
2 |
|
Carrack |
80 (2X40) |
3 |
2 |
9 |
.4 |
2 |
2 |
|
Royal Galleon |
86 (2X43) |
4 |
2 |
10 |
.5 |
2 |
2 |
Bad things doth happen to good people.
Chapter 10: Frequently Asked Questions
Here are some questions that have been asked, which may answer questions that you have:
Q:
Is there a colour map available for me to print out and plan my moves?A:
No. But, you could do this by:Some day some kind soul will upload this to the discussion group. Until then, we are all on our own.
Q:
I am having problems reading the file attachment you sent me (md9N02.new). It come up as a word document, and is not allowing me to translate it into any other format, nor moving the file elsewhere. Please assist.A:
Each player is sent their results as a file attachment (a .new file). Do not try to open this file from your mail program. Just save it somewhere on your computer (remember where it is). First, open your Diploware. Then select "load turn", and then select the file "md9N02.new". If you are using a mail program, just select "Save File", don’t try to open it with a different program.Q:
One of the realms in my game does not seem to be replying to emails, what should I do?A:
Some people are not interested in diplomacy, and no one has to reply to email messages. Also, sometimes players drop out of the game for various reasons, the average is about 12% as time goes on, and it’s just a normal part of the game process. A Realm without an active player represents a domain in a state of civil unrest, which is not able to pursue their global conquest goals. If the nation is viable, the GM will attempt to get a replacement player. The GM is likely to do so if a player doesn’t send in the first turnfile of the game, or if he misses two consecutive turns during the game.Q:
Why are the Mongols so weak? Their cavalry isn’t as powerful as the Western ones, and there’s no heavy infantry. Shouldn’t they be stronger?A:
The Mongol cavalry move faster than any other horse units in the game – only the Muslim nomads can keep up with their speed. The Mongol Bowmen are excellent for garrison work, and the Mongol Horde Warriors will do a perfectly adequate job as front-rowers for the army. The Mongol Horse Archers are a little weaker than knights, but they are also cheaper to build and require less upkeep. A strong Mongol cavalry army can move through two enemy provinces at a time – no other nation can do this. It is up to a leader of the Mongols to use these strengths to offset any perceived weaknesses. Actually, the question may well be asked, "How do we stop the Mongols from taking out all our provinces in just one or two turns?"Q:
In places where land masses are quite close together across seas, can troops cross between them just by marching?A:
Clicking on any location will show the adjacent locations.Q:
Another player gave me all his lands before quitting the game. Now another person has been given control of that country’s troops – and lands. What is going on?A:
I know this is disappointing, but if a ruler attempts to give away all of his provinces and disband all his forces, then his lesser nobles will overthrow him in a palace coup (that would be an unchivalrous and cowardly act, and all Europe would despise the perpetrator). In that case, his orders won’t happen, and he will be dethroned, tortured, drawn and quartered, beheaded, and finally burned at the stake.Q:
I'm having trouble loading my army onto my fleet. Here is the situation:Q:
Can you please clarify to me how pillage works? They way I see it, I can station any unit (except a Siege machine) in a province and then pillage it every other round (e.g. Round 1 pillage, Round 2 let it repair, Round 3 pillage, Round 4 let it repair, etc.), so that I get the province's income every other turn. Is this correct? Is there a chance of revolt due to pillaging? Of failure to pillage (even having combat > 10)?Q:
When I cede a province, independents gain control. Do they create armies immediately? Can I cede a province and pillage it in the same turn?Q:
In the rules it says:A:
This will be hard to send overland with a route filled by foreign realms, but you can use sea zones if there is no enemy fleet in them. To use a province though, you need passage rights (or special permission) for all provinces in between. This is because you will need to be sending a caravan through those locations.Q:
Let's suppose I have 2 armies. Army #1 is actually a peasant on rank 1, retreat lvl 5.I attack a territory with these 2 armies.
Round 1
Army #1: 0 hits
Army #2: 30 hits
Enemy Army #1: 40 hits
Army #2 retreats after the 1st round (it has no troops on rank 1). The battle continues.
Round 2
Army #1: 0 hits
Enemy Army #1: 35 hits
Now... I will only lose 1 peasant while my foe will take 30 hits. Is this right?
Q:
If my army retreats to the territory where it came from, and this territory is attacked in the 1st phaseQ:
I noticed that an army must stop moving after fighting a battle. Does this apply to fleets as well?Q:
I am unsure about this question, can armies retreat to ships in amphibious assaults?Q:
I got the impression that only one phase of battle occurs in a turn. Is that right?
Q:
I had a question about commanders in battle. The rules state two different things. It says that commanders are taken last, "no matter what." Then a few sentences later it says that if the commander is killed, other troops in the 5th rank fight like there is no commander. So, are commanders in sort of a 6th rank, and they are the last to be killed or just in the 5th rank and once the 5th rank is reached that can beQ:
I’ve become addicted to this game, what should I do?A:
As of yet, there is no 12 step program for Medieval Warlords. It is very addicting, and you can feel better knowing you are not alone. At least it’s better than being hooked on crack :).
Q:
Sea provinces a, b, c. Enemy fleets F1 and F2, positioned in a and c respectively. F1 is loaded with troops. Both fleets sail to b in Phase 1. F1 has been ordered to unload the troops it's carrying. Will F1 unload its troops before fighting F2 or after? (that's the question I doubt anyone but you can answer...)Q:
Suppose a fleet is carrying some land units. Can I order it to split in two and have some of the troops remain in one part and some go to the other? How? Can I order it to unload some of the troops and not all?Q:
Suppose a fleet is loaded with more troops than it has marine capacity for. Suppose said fleet is engaged in battle. For example a fleet with marine capacity 4 is carrying 8 units. Will only the first 4 units fight during the battle or will the next 4 enter the fray as soon as the first 4 are destroyed?
- End -